 Remote Support
 Remote Access
 Remote Work
 Remote Monitoring and Management
 Remote Presentation
 Standard
 Business
 Enterprise
SimpleHelp Administration GuideA comprehensive guide to configuring your SimpleHelp server.
|
Administration Console
The Administration Console is a tab in the technician console which is only accessible to the SimpleHelpAdmin administrative user. You can log in as the administrative user by following these steps:
- Open your web browser and navigate to the technician address of your installed SimpleHelp server (the /technician page of your server installation).
- Download and run the Technician application.
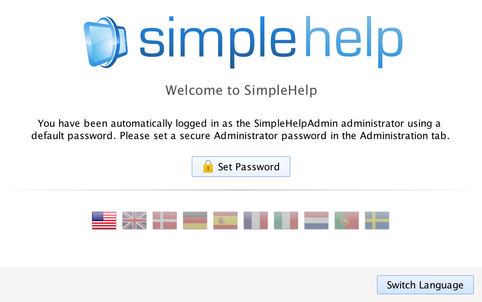
- Log in as the SimpleHelpAdmin user. If this is the first time you are accessing the server you will not be required to log in, but will be presented with the following message:
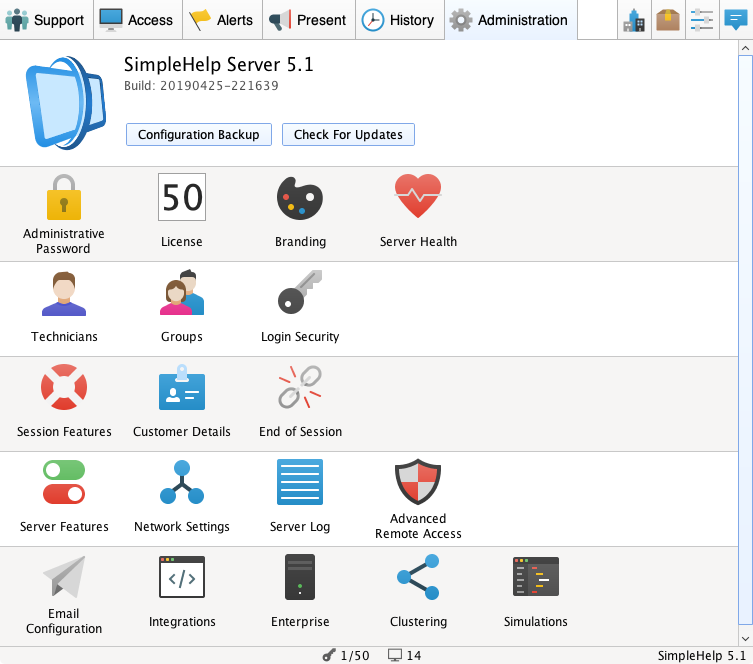
- Select the Administration tab and you will be presented with the Administration Console:
Changes made in the Administration tab are saved automatically and are immediately used by SimpleHelp.
The Administration tab is divided into the following sections by row:
The Administration tab is divided into the following sections by row:
- Overview - important information at a glance, including the server version, and important actions like creating a configuration backup and checking for server updates.
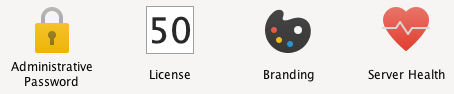
- Getting Started - important settings that should be set as soon as possible, or may be accessed often. This includes setting the Administrator password, managing your server's license, branding your server, and running diagnostic tests.
- Technician Settings - settings related to technician accounts, technician groups and technician-related security.
- Session Settings - settings related to remote support and remote access sessions, including what information to collect from your customers, actions to be taken at the end of a session and other pre-session settings.
- Server Settings - core server settings, including network settings like the IP and port to use, which features should be enabled and advanced security settings for remote access services.
- Integrations and Enterprise - settings that help SimpleHelp interact with other servers, like SMTP servers for sending email and LDAP for authentication, as well as setting that allow other servers to collect information from SimpleHelp.
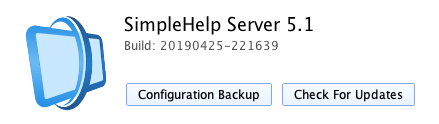
Overview Section
The overview section includes important server information. It also provides a quick way to check if an updated version of SimpleHelp exists, and to create a backup of your server's configuration for safe keeping.
Checking for Updates
SimpleHelp will not automatically check for updates. If you wish to see whether a new version of SimpleHelp is available you can press the Check for Updates button in the Overview section. SimpleHelp will then notify you whether a new version of the server exists.
If a new version of SimpleHelp is available, SimpleHelp will additionally notify you whether or not the new version falls within your support period. If it does, you can upgrade for free, else you will need to purchase a license update on our site.
If a new version of SimpleHelp is available, SimpleHelp will additionally notify you whether or not the new version falls within your support period. If it does, you can upgrade for free, else you will need to purchase a license update on our site.
Configuration Backup
All your server's settings and resources are stored in a single folder, called configuration, in the SimpleHelp installation directory. Keeping a backup of this is very important as it will allow you to recover your server should something go wrong. You can create a backup of your server's important configuration files by using the Configuration Backup button.
NOTE: Creating a backup through the technician console will not save any video recordings that have been synchronised with the server. To backup video recordings copy the configuration folder directly from the server.
NOTE: Creating a backup through the technician console will not save any video recordings that have been synchronised with the server. To backup video recordings copy the configuration folder directly from the server.
Getting Started
The Getting Started section contains configuration settings that you should set while getting started with SimpleHelp.
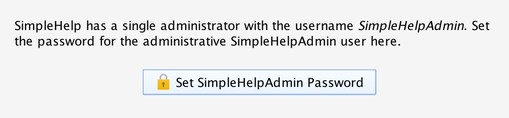
Changing the Administrator Password
When you access SimpleHelp for the first time you will be reminded to set an Administrator password. This is the password for the SimpleHelpAdmin user, and can set it at any time by clicking on the Set SimpleHelpAdmin Password button.
Server Licensing
In order to activate your SimpleHelp server you will need to upload a SimpleHelp license file. A SimpleHelp license is a small text file that tells the SimpleHelp server how many active sessions should be allowed concurrently. The License settings contain a summary of your license details, similar to the following:

The license summary will also notify you whether or not your support period is still valid. If it is valid, it also shows the future date when the support period expires. Remember, you do not need up to date support to run your existing SimpleHelp server indefinitely, but will need to update your license if you wish to upgrade the server in the future.
To install a license click the Install license button. If you have a license installed, but wish to increase the session count, you can do so by clicking the Add more sessions button. Remember that once you have upgraded your license you will be issued with a new license file that you must upload here in order for your server to know about the changes.
To install a license click the Install license button. If you have a license installed, but wish to increase the session count, you can do so by clicking the Add more sessions button. Remember that once you have upgraded your license you will be issued with a new license file that you must upload here in order for your server to know about the changes.
Branding SimpleHelp
In this section we outline the branding options available in the Administration console. Further branding options can be found in our separate Branding Guide. From SimpleHelp v4.2, certain branding options have been moved into a Branding section in the Administration console, as shown below:
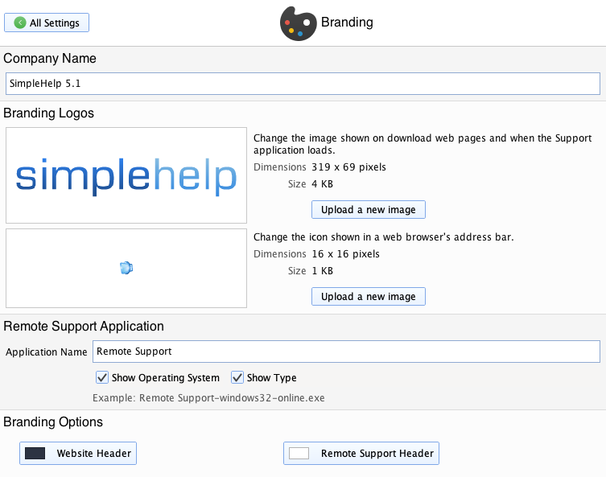
Company Name |
Your company name, used to replace SimpleHelp throughout the support application. |
Branding Logos |
A large logo to be shown when the customer launches the Support application, and a small favicon .ico image that is shown in your customer's browser when they navigate to your site. |
Application Name |
The name of the support application when it is downloaded by a customer. |
Show Operating System |
Check this option to append the operating system (windows, macos, linux) to the application name. |
Show Type |
Check this option to append the type of application (online, offline) to the application name. |
Branding Options |
Specify the colour of the banner for the server's HTML pages, and the colour of the Remote Support application banner. |
Perform a Server Health Check
SimpleHelp can perform some basic checks to detect whether it has been configured properly and whether it is publicly accessible on the Internet. You can run these check by pressing the Check Server Installation button:

SimpleHelp performs four checks:
- Public Accessibility - checks whether your SimpleHelp server is accessible on the Internet. If accessibility fails, check the option Automatically map server port to instruct SimpleHelp to try to automatically configure your router to allow access to the SimpleHelp server.
- Public IP Address - if successful, SimpleHelp will detect and display the public, external IP address of the server. The address it detects is not necessarily the only address that can be used to access the server.
- Windows Firewall - SimpleHelp queries the Windows Firewall configuration to identify whether incoming connections are allowed to your SimpleHelp server. This operates as a warning and does not necessarily indicate that the firewall is blocking access.
- Ports - SimpleHelp warns the user if the recommended ports (80, 443) are not in use.
Configure Server Memory Usage
The SimpleHelp server will always operate within a configurable memory limit. The default memory limit is set to 384MB. Your server will notify you when the available memory drops below a threshold. You can monitor the system's memory usage or change the memory limit from the Server Memory Usage panel, shown below.

Automatically Remove Previous Recordings
SimpleHelp can be configured to automatically record sessions, but session recordings can take up an excessive amount of disk space over time. The Session Recording Removal section allows you to configure SimpleHelp to automatically remove recordings after a specific amount of time.

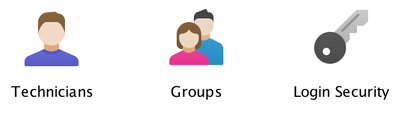
Technicians and Groups
The Technicians section allows the SimpleHelp Administrator to create accounts that technicians can use to connect to the SimpleHelp server. Technicians can be configured individually, or can be grouped and configured together as Technician Groups. Technician groups allow the server administrator to easily configure multiple technicians identically without have to configure each one individually. The technician and technician group settings are shown below:
Managing Technicians
You can create a new technician account by choosing the Technicians settings and pressing the green + icon:
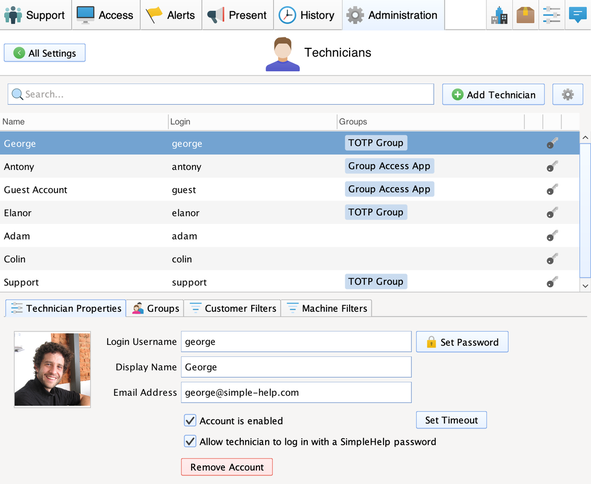
A new technician account will be created with a default login name. You can then configure the following settings for the new technician:
Login Username |
The username that will uniquely identify this technician. This is the username that is used by the technician to log into SimpleHelp. |
Display Name |
The name that is displayed to customers for this technician. |
Email Address |
The email address of the technician where they can receive updates and alerts. |
Account is Enabled |
Check to enabled this account. Uncheck it to prevent the account from being used. |
Set Timeout |
Configure a timeout after which this account will no longer be accessible. |
Allow Technician to Login with a SimpleHelp Password |
Uncheck this to force the technician to authenticate via their technician group authentication method. |
To configure the new technician's password press the Set Password button.
SimpleHelp, by default, assumes that the technician can log into the server using their SimpleHelp credentials. If an external authentication service (such as LDAP) is setup then you can disable logins using a technician's SimpleHelp password by unchecking the box titled Allow technician to log in with SimpleHelp password. Technicians will subsequently have to authenticate via their technician group to login.
SimpleHelp, by default, assumes that the technician can log into the server using their SimpleHelp credentials. If an external authentication service (such as LDAP) is setup then you can disable logins using a technician's SimpleHelp password by unchecking the box titled Allow technician to log in with SimpleHelp password. Technicians will subsequently have to authenticate via their technician group to login.
Changing the Technician's Avatar
You can upload an image that will be used as a technician's avatar. The avatar is shown when the technician is chatting with a customer, and when the technician presence dialog is shown on a remote machine. To upload or change an avatar click on the avatar image and choose a new avatar image to use. Images must be PNG, JPEG or GIF format.
Adding a Technician to a Group
To configure which groups a technician is in, or which groups the technician can administer, click on the Groups tab:
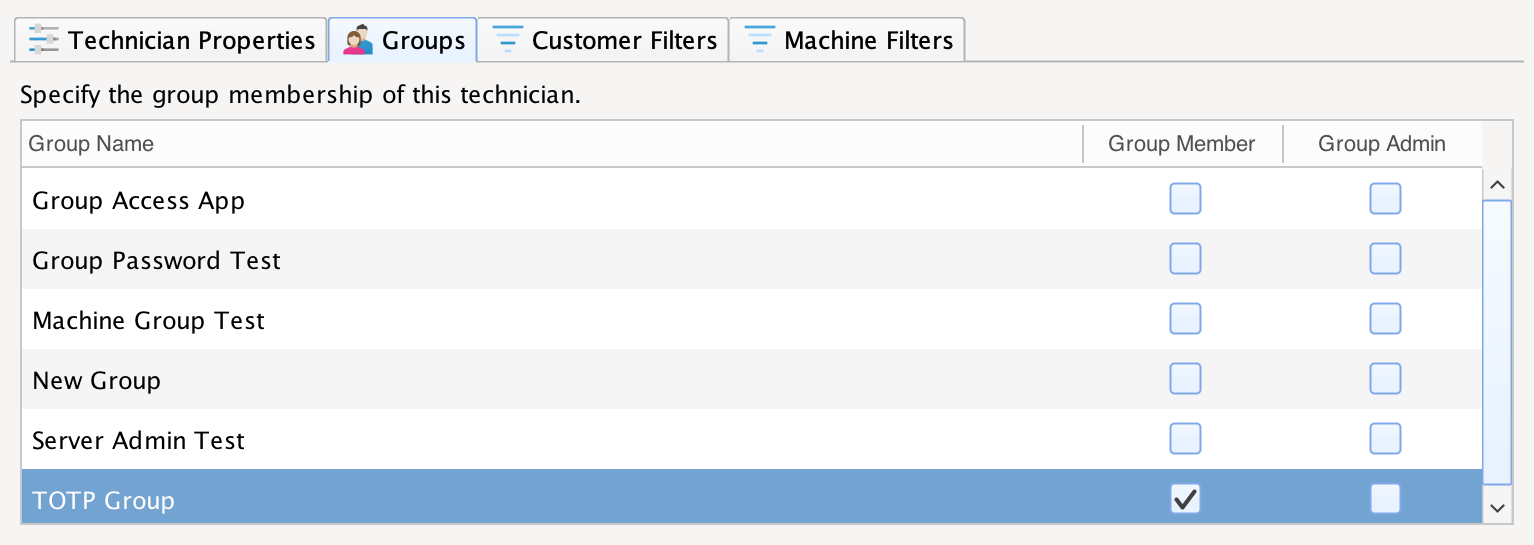
Groups that are checked will include the selected technician. Each technician can be associated with any number of technician groups. Technician groups can be used to set configuration settings that are common to multiple technicians.
Picking Customers that a Technician can Access
Customer Filters are used to restrict which customers this technician can access. Please see our Filtering Guide for additional information on how to restrict the list of customers for a technician account.
Picking Machines that a Technician can Access
Machine Filters are used to restrict which machines this technician can access. Please see our Filtering Guide for additional information on how to restrict the list of machines for a technician account.
Technician Groups
Technician Groups play a central role in the configuration and management of multiple technician accounts. Groups allow you to specify properties that are common to many technicians in a single place, allowing for simpler maintenance and management. Groups are also central to configuring advanced technician properties such as LDAP authentication.
Creating New Technician Groups
Click on the green plus to add a new Technician Group. You will then be able to configure the new group using the following properties:
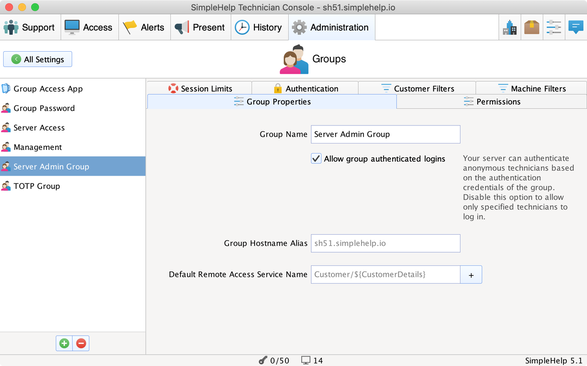
| Group Name | The name that uniquely identifies this group. |
| Allow Group Authenticated Logins | SimpleHelp has the ability to authenticate technicians that do not have prespecified technician accounts. In this situation authentication is performed via LDAP or a group password. To allow anonymous group-based logins check this option. |
| Group Hostname Alias | The SimpleHelp server will use this group hostname for all correspondence sent on the behalf of technicians in the group. This overrides the default server hostname specified in the Server configuration. |
| Default Remote Access Name | Specify the default remote access name used when installing a remote access service. Please the + button to include macros that are substituted in at runtime. |
Setting Technician Permissions
SimpleHelp has comprehensive technician permission settings that apply to all technicians that are members of the group. By selecting the permissions required an administrator can effectively control what technicians are capable of doing using SimpleHelp.
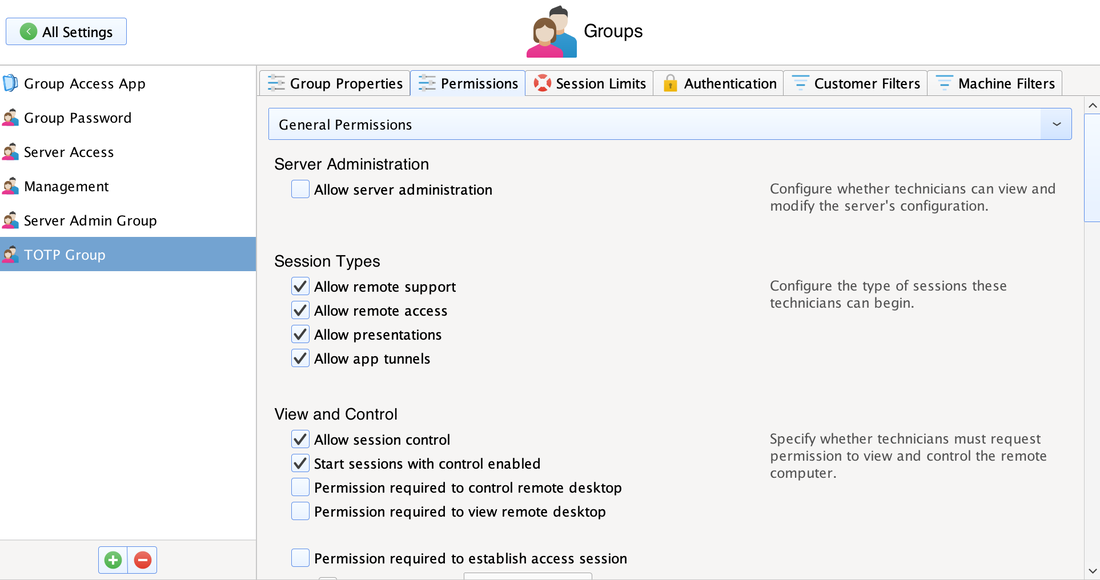
Server Administration |
|
| Allow server administration | Check this option to allow technicians in this group to administer the SimpleHelp server. |
Session Types |
|
| Allow remote support | Check this option to allow technicians to connect to on demand remote support customers. |
| Allow remote access | Check this option to allow technicians to connect to remote access services. |
| Allow presentations | Check this option to allow technicians to host presentations. |
| Allow app tunnels | Check this option to allow technicians to use app tunnels. |
View and Control |
|
| Allow session control | Choose whether technicians can control remote sessions. |
| Start sessions with control enabled | If checked sessions started by technicians will automatically allow remote control. |
| Permission to control remote desktop | If technicians can control sessions, choose whether they must explicitly request this control. |
| Permission to view remote desktop | Choose whether technicians must request to view the remote screen. |
| Permission to establish access session | Check if technicians must request access (and have it be granted) prior to establishing a remote access session. |
| Allow access timeout | Specify a duration after which the technician will automatically be granted access. |
Terminate |
|
| Can remove customers from the queue | Check this option to allow technicians to remove remote support customers from the waiting queue. |
| Can view all connected sessions | Check this option to allow technicians to see the connected sessions of other technicians. |
| Can terminate any session | Check this option to allow technicians to terminate sessions initiated by other technicians. |
Remote Access Services |
|
| Allow installation of remote services | Check this option if technicians can install persistent connection services through a SimpleHelp support session. |
| Allow management of remote services | Check this option if technicians can repair and stop remote services from the technician console. |
Session Recording |
|
| Can record sessions | Check this option if technicians are allowed to record support sessions. |
| Can upload sessions to server | If checked, technicians can upload their session recordings to the SimpleHelp server. |
| Technicians can manage recordings | Allow technicians to manage and delete session recordings. |
| Force technicians to record sessions | Check if technicians must always record sessions. |
| Force technicians to upload recordings | Check if technicians must always upload recordings to the SimpleHelp server. |
| Default recording password | Set the default recording password that is used to password protect recordings hosted on the SimpleHelp server. |
In Session Functionality |
|
| Allow port forwarding | Choose whether technicians can utilise port forwarding functionality. |
| Allow file transfer | Choose whether technicians can utilise file transfer functionality. |
| Allow diagnostics | Choose whether technicians can utilise diagnostics mode functionality. |
| Allow remote audio | Choose whether technicians can hear sounds from the remote computer. |
| Allow text echoing | Choose whether technicians can use text echoing in the session user interface. |
End of Sessions |
|
| Lock the desktop | Lock the desktop automatically when a session ends. |
History |
|
| View own session histories | Check this if the technicians should be able to view their own session histories. |
| View group session histories | If checked technicians can view histories produced by any technician in their group. |
| View all session histories | Check if this technician can see all session histories. |
Monitoring |
|
| Manage monitoring state | Check this permission if technicians should be able to choose whether a machine is monitored. |
| View collected data | If checked, technicians in this group can view data collected during monitoring. |
| View screenshots | Check if the technician is allowed to view the remote desktop. |
| View general metrics | Check if the technicians can view general metrics like top processes and disk space metrics. |
| Allow file copy | If checked technicians can copy to and from the remote machine via the Access tab. |
Toolbox |
|
| Run tools in the Access tab | Allow technicians to run toolboxes on the remote machines in the Access tab. |
| Run tools in sessions | Allow technicians to run toolboxes in a support or access session. |
Alerts |
|
| Manage monitoring alerts | Allow technicians to create and configure monitoring alerts. |
| Manage server events | Allow technicians to create and configure server event alerts. |
| View all created by this group | Allow technicians to view alerts created by technicians in the same group. |
Session Type |
|
| Allow UDP connections | Allow technicians to utilise UDP-based connections (4 and 5 star connections) |
| Preferred session type | Set the preferred session type for new technicians. |
| Update technician preferences | Update existing technician preferences so that the preferred session type is selected. |
Limiting the Number of Sessions and Data that a Group Uses
You can restrict the number of active SimpleHelp remote support and remote access sessions that a group of technicians can utilise, as well as the amount of data that a session uses.
Remote support and remote access session limits are group limits, meaning that one technician could use the entire group's allocation. You can specify the maximum sessions for all users within the group, as well as the maximum sessions per technician:
Remote support and remote access session limits are group limits, meaning that one technician could use the entire group's allocation. You can specify the maximum sessions for all users within the group, as well as the maximum sessions per technician:
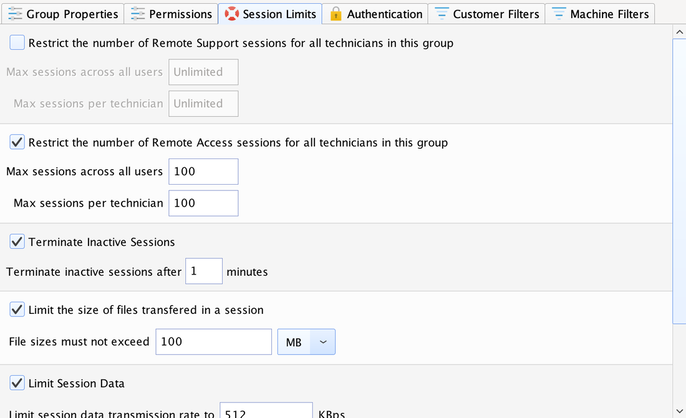
SimpleHelp also allows you to configure the server to automatically disconnect inactive sessions. Inactive sessions are sessions where no file transfer is ongoing, and the technician has not interacted with the session window in some time. After the time duration is passed SimpleHelp will automatically terminate the session and notify the technician.
You can also limit the size of files that can be transferred within a session. If set, technicians will not be able to use the file transfer capabilities within SimpleHelp to transfer a file that is larger than this limit.
Limiting the session data will prevent a session from utilising more data that the specified amount. This applies to each session that is started. Similarly, restricting the frame rate ensures that technicians cannot request more than the specified number of updates per second.
Group Level Authentication
By default all technicians can log into SimpleHelp using their technician password. If you wish to allow anonymous logins, or you wish to have SimpleHelp use an external credential source for technician logins then you will need to specify an authentication mechanism. Additionally, if you wish to increase login security you can do so by configuring a multi-tier authentication scheme here.
Group Passwords
Group passwords allow you to set a single password that can be used by all members of the technician group. If the group allows anonymous logins, then technicians can log in with any username and the common group password.
LDAP Authetication
Every group configured to use LDAP authentication makes use of the LDAP server configuration from the Server section of the Administration tab. The group configuration then allows the administrator to configure specific search filters for the technicians in this group. LDAP authentication can be used to authenticate technicians against an Active Directory server. For more details about how to configure LDAP authentication see our Authentication Guide.
RADIUS Authentication
SimpleHelp can authenticate technician accounts with a RADIUS authentication server. The SimpleHelp RADIUS client implementation supports challenge requests and responses, so a single RADIUS setup can validate technician logins, but also provide a second factor passcode. For more details about how to configure RADIUS authentication see our Authentication Guide.
Email / App Based Second Factor Authentication
In order to further secure technician logins, SimpleHelp can require a one time password in addition to the technician's username and password. To configure multi-factor authentication see our Authentication Guide.
Specifying Customer and Machine Filters
Instead of specifying filters on a per-technician basis you can specify filters that apply to all technicians within the group. At runtime SimpleHelp merges the technician-specific filters with all the corresponding group filters, and uses this aggregate set of filters to decide whether customers or remote machines are visible. The procedure for setting/removing filters is the same as that for technicians.
Technician Login Security
The Security tab gives the Administrator an opportunity to further lock down and secure the SimpleHelp server, either by restricting the IP addresses that a technician can utilises to access the server, by configuring two tier authentication for the SimpleHelpAdmin user or by configuring LDAP authentication for all technicians.
Restricting Technicians by IP Address
Technician restrictions can be added to a list of allowed IP address filters:

Restrict the networks from where technicians can connect to the SimpleHelp server. The list of allowed networks include the * entry by default, indicating that every network is allowed. To add a network, click on the green plus button. Examples of possible network restrictions are:
- * - allow technicians to connect from any network.
- 192.168.*.* - allow technicians to connect from any machine on the subnet 192.168.x.x.
- 192.168.1.* - allow technicians to connect from any machine with addresses in the range 192.168.1.1 to 192.168.1.254.
Two Tier Authentication for SimpleHelpAdmin
As with standard technician accounts, SimpleHelp supports additional email and app based authentication factors for the SimpleHelpAdmin user. For details about how to configure these forms of authentication see our Authentication Guide.
NOTE: Ensure that you have correctly configured the SimpleHelp server to send emails before enabling two tier authentication for the SimpleHelpAdmin user.
LDAP Authentication
When a technician logs into SimpleHelp their credentials are validated against the server's internal list of technicians. You can optionally configure SimpleHelp to also query an LDAP server, such as Microsoft Active Directory, to validate credentials. The benefit of this approach is that a single repository of technician login details is maintained, and technicians can log in using their normal passwords.
The following steps occur each time a technician logs into SimpleHelp when LDAP is configured:
Configuring SimpleHelp's LDAP authentication is therefore split into two parts:
For more details about how to configure LDAP authentication see our Authentication Guide.
The following steps occur each time a technician logs into SimpleHelp when LDAP is configured:
- SimpleHelp connects to the LDAP server using a predefined Administrator account.
- The directory is searched to identify all users, filtered according to a search filter so that a single matching user is found.
- SimpleHelp reconnects to the LDAP server using the identified user and the password that the technician provided.
- If LDAP authentication is successful then the technician is granted access to SimpleHelp.
Configuring SimpleHelp's LDAP authentication is therefore split into two parts:
- LDAP Server Configuration - provide the LDAP server details and administrative credentials so that SimpleHelp can access your LDAP directory. This is detailed in the following section.
- Technician Group Configuration - configure authentication for a technician group, specifying the user search filter to be used when authenticating members of the group, as detailed in the Technician Settings section below.
For more details about how to configure LDAP authentication see our Authentication Guide.
Session Settings
The session settings configure all aspects of support and access sessions like pre-session settings, the details collected during a session and the actions to be taken when a session ends.

Disclaimer
SimpleHelp displays a text disclaimer that customers must accept to initiate a remote support session. The contents of the disclaimer can be configured, or skipped entirely, to meet your customer needs. You can alter the disclaimer text from within the Customer Disclaimer tab of the Administrative console. If no disclaimer text is set the disclaimer dialog will be skipped.
Showing Technician Presence Dialogs
By default, when a technician establishes a remote support or remote access session no visual notification is presented on the remote machine. If you wish to notify potential users that the remote machine is in use, you can configure a presence dialog to appear. The dialog details the name of the technician using the remote machine, as well as when the session was started.
Queue Authentication
Queue authentication restricts arbitrary access to the support queue. New customers that attempt to access the queue will need to enter in the specified password. Note that customers that connect using invitations are not required to enter the queue password, but must have a valid invitation code.
Windows Elevation
The windows elevation setting allows you to decide whether the remote support application should automatically ask for Administrator credentials when it starts up. These credentials are not required to start a session, but if provided result in an elevated session. Sessions that are elevated allow the technician to interact with other elevated applications. Technicians that access a session that is not elevated are notified and are able to elevate at a later point if required.
Customer Information
SimpleHelp asks the customer to enter details into a dialog prior to the session initialising. This dialog collects customer information that allows technicians to easily identify the new sessions. The dialog can be configured through the Customer Information tab:
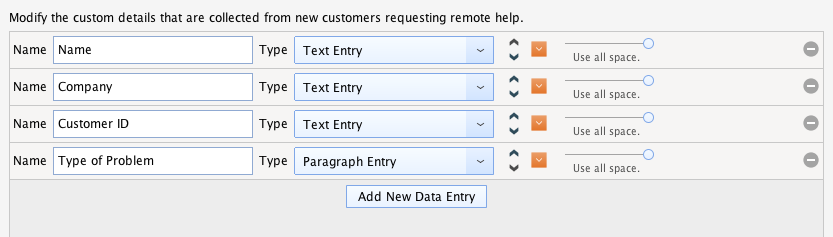
Each field is listed on a row. You can add a new field at any time by pressing the Add New Data Entry button. Each data entry can be configured as follows:
| Name | The name of the field is the field label shown to the customer and the name used to identify the field in logs and emails. |
| Type | The type of the data to collect. The types and their descriptions are presented below. |
 |
Use the ordering buttons to reorder the list of entries. |
 |
Press this button to expand the data entry to show advanced configuration options specific to the type selected. |
 |
Select the width of the field. |
 |
Delete the data entry. |
The list of available data collection types are:
| Description | Show the customer a description as a static label. There is no data entry field shown. |
| Text | Show a single line data entry field, configurable to accept text, numbers, email addresses etc. |
| Paragraph | Show a multiple line data entry field. |
| Single Choice | Show a single choice option as a check box. |
| Choice List | Show a list of choices as a drop down box. |
| Choice Group | Show a set of choices as a radio button group. |
End of Session
Configure the automatic actions that should be taken when a remote support or remote access session is ended. Currently, two options exist: Do nothing and Open a webpage on the customer machine:
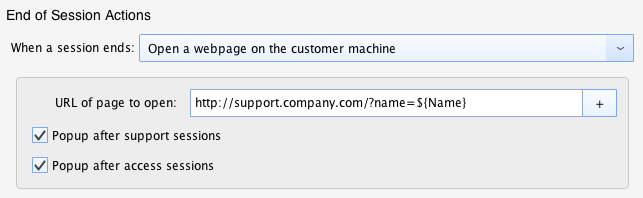
To open a web page on the customer's machine you need need to configure:
| URL of page to open | The URL of the webpage that is to be opened after the session. |
| Popup after access sessions | Check this option if the webpage should be opened after a support session. |
| Popup after support sessions | Check this option if the webpage should be opened after an access session. |
The webpage End of Session action can also be configured to pass in customer information to your web page once a session finishes. You can insert a macro (such as ${Name}) above into the URL and SimpleHelp will substitute the customer's details into the URL before the web page is opened. You can easily add a macro into the url by pressing the + button.
Configuring the End Of Session Dialog
SimpleHelp can optionally collect additional information from the technician when a session finishes. The technician is shown a dialog when the session completes where they can enter in additional information and configure what data is collected. You can configure what is shown in this dialog with these options:
| Technicians can leave session comments | When the session terminates, allow the technician to leave comments that are included in the session summary events. |
| Allow technician to skip summary | Choose whether technicians are required to leave comments. |
| Include customer email address | The technician can optionally enter a customer-specific email address that will be included in the generated event. The default value presented to the technician can be selected here. |
NOTE: the above configuration options are used to determine the layout of the end of session dialog. When a session ends the SimpleHelp server will generate end of session events which will include this information. To process this information and to act on it the Administrator must configure appropriate actions in the Logging Framework. For configuration of the Logging Framework please see the following section.
Server Settings
The Server Settings section groups together settings that configure how the server operates. These includes which server features to expose, the default web page to show when the server is accessed, network settings include the server's public domain name and advanced security settings for remote access services. Additionally, you can retrieve the most recent portion of the server's logging file.

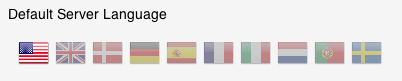
Setting the Default Server Language
Each new application downloaded from the SimpleHelp server will by default use the English (US) language. The server administrator can change this default by choosing from one of the offered languages. Each new application will use this language, although the setting can be overridden by the technician, or by using a configured download link that specifies a different language.
Restricting the Server Features
SimpleHelp provides a range of functionality grouped into a set of core features: remote support, remote access, presentations and mobile access. You may not wish to use all of these features. If you wish to restrict your server's functionality you can do so by choosing which features to enable. Changing the features requires technicians to log in again.

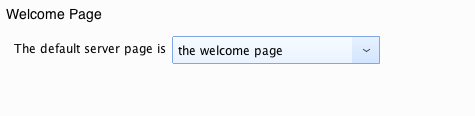
Choosing the Default Welcome Page
The default server behaviour is to shown the SimpleHelp Welcome page when the server is accessed using a web browser. The welcome page is designed to help introduce you to SimpleHelp, and is not intended to be shown to your customers. Instead, we suggest embedding SimpleHelp into your website to create a seamless experience for your customers. However, if you wish to send your customers to the SimpleHelp server address you can switch the default page to be the Remote Support application download page, instead of the welcome page.
Setting a Server Domain Name
Enter the domain name or public IP address for your server:

The public address is used when SimpleHelp sends out invitation addresses and presentation URLs. Make sure that your server is responding on this domain name. The entry should include the port if required.
Configuring Server Ports
The SimpleHelp server needs to listen for incoming connections on at least one IP address and port. When configuring which ports to use you can either specify that SimpleHelp uses all IP addresses, or alternatively that it binds to specific IP address and port combinations:
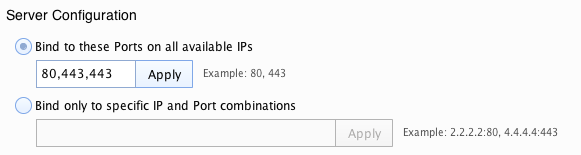
- To bind to one or more ports choose Bind to these ports on all available IPs and enter in one or more ports separated by commas. We recommend using ports 80 and 443 for SimpleHelp.
- If you need SimpleHelp to bind to a specific IP and port combination then select the second option and enter the IP:port combinations separated by commas. SimpleHelp will bind to each of the listed IP address / Port combinations. This is useful on servers with multiple IP addresses, where you wish to have different servers listening on the same ports (but different IP addresses). This is an advanced option and should only be used where required.
Configuring an incorrect port or IP address may render your server unavailable. If you are unsure what the settings should be it is recommended you use the option Bind to these Ports on all available IPs.
Configuring HTTPS / SSL Access
SimpleHelp uses the HTTPS protocol for mobile access to ensure that all browser-based communication with the server is always secure. When SimpleHelp is installed and run for the first time it automatically generates a self-signed SSL certificate to use. Since the certificate has now been issued by a certificate authority users will see a warning when accessing web pages over SSL. You can use the HTTPS / SSL settings to upload an existing SSL certificate that you may have, or you can generate a new self-signed certificate if you wish to.
As of SimpleHelp v4.4, SimpleHelp now offers support for free Let's Encrypt SSL certificates. These SSL certificates are valid for short period, typically about 90 days. SimpleHelp is able to generate such certificates, but also to renew them automatically periodically before they expire.
NOTE: SimpleHelp always encrypts all communication with the server using its own standards-based encryption. Configuring SSL does not affect the encryption used in a session.
To start setting up a SSL certificate press the Set a SSL Certificate button:
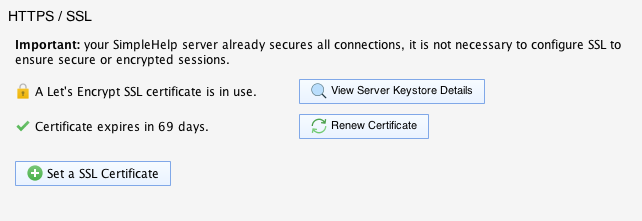
You will be presented with three SSL certificate options:
- Generate a self-signed certificate. Self-signed certificates can be used to encrypt access to your SimpleHelp server, but are not produced from a trust authority. Users will be shown a warning in their browser when accessing your SimpleHelp server.
- Create a Let's Encrypt certificate. Let's Encrypt certificates are free SSL certificates that are trusted by modern browsers.
- Upload an existing certificate. Use an existing SSL certificate to secure your SimpleHelp server domain. For information about how to bundle your SSL certificate see our SSL Guide.
Let's Encrypt Certificates
Let's Encrypt Certificates can automatically be generated by SimpleHelp for any server that is publicly accessible on port 80. When creating a Let's Encrypt certificate you will be presented with the following configuration:
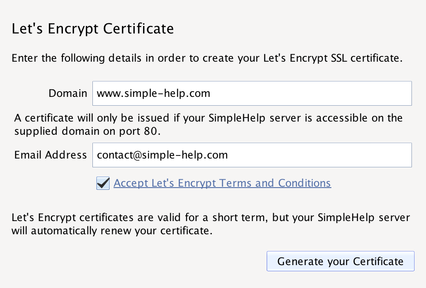
Let's Encrypt will validate the domain name entered, so it must match the address of the SimpleHelp server, and must be publicly accessible on port 80. Additionally, the email address will be used to notify you when your certificate is due to expire. Since certificates are free they are valid for a short period. Once a Let's Encrypt certificate has been setup SimpleHelp will automatically renew the certificate for you after 60 days.
Using an Existing Certificate
If you wish to use your own SSL certificate you can do so by following these steps:
- Choose the Existing SSL Certificate option.
- Ensure your SSL certificate is bundled in a keystore along with your certificate's private key as well as any intermediate and root certificates. See our SSL guide for instructions on how to do this.
- Configure the keystore location, keystore password and private key password so that SimpleHelp can locate and access it.
- Press the Check SSL Store button to verify that the keystore has a complete certificate chain.
- Press Upload SSL Store with Certificate to upload the keystore to the SimpleHelp server.
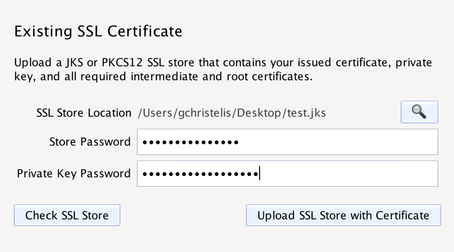

The keystore structure must be correct and complete before SimpleHelp will accept the SSL certificate chain as valid and proceed to use it. Instructions to create a keystore for a particular SSL certificate are provided by the certificate authority where the certificate was purchased. Once installed, we suggest using a SSL validation checker like http://digicert.com/help to ensure that certificate is installed and valid.
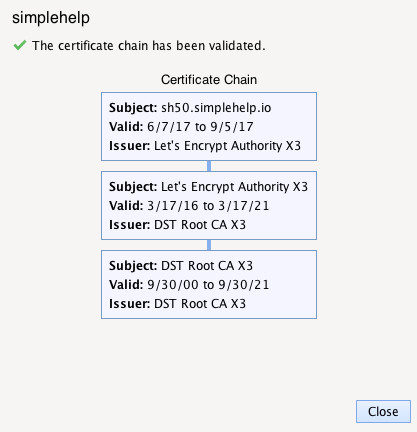
Clicking the button View Server Keystore Details will request the current keystore details from the SimpleHelp server and will notify you whether the certificate chain is valid. If it is valid, each certificate in the chain will be listed, as follows:
Server Log
The SimpleHelp server logs a variety of server information to a single log file called server.log that is stored in the server's installation folder, but can be retrieved for monitoring or troubleshooting purposes through the Administrative console.
If you wish to retrieve the server log directly from the file system on the server, navigate to the server's installation directory.
If you wish to retrieve the server log directly from the file system on the server, navigate to the server's installation directory.
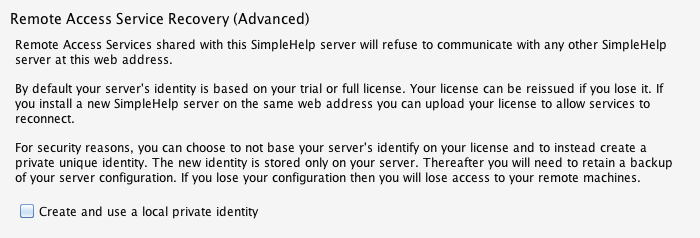
Remote Access Service Recovery
Remote Access Services in SimpleHelp 4.2 utilise cryptographic key security to provide added security. When a remote access service is set up, it fetches a unique identifier from the SimpleHelp server. From then on, the remote access service will only communicate with a server that identifies itself using the same identifier. This ensures that SimpleHelp is not susceptible to a great variety of attacks, including domain spoofing. Additionally, remote access services are not compromised if any certificate authority is.
When a server does not identify itself correctly, the remote access service will refuse to communicate with the server until the server uses the correct identifier. The identifier forms part of your server's configuration folder, and is backed up along with your other settings. SimpleHelp can be instructed to allow services to register with a different server which is licensed using the same license as the previous one, however this can be prevented for added security. If you are sure that you have numerous configuration backups, then check Create and use a local private identity to turn this one.
Note that if this option is checked there is nothing that can be done to retrieve services if the server's identifier changes and a backup cannot be restored. See our Security Guide for more details.
Automatically Cleaning Up Remote Access Services
As Remote Access Services disconnect from the SimpleHelp server they appear as offline in the Access tab. It is possible to manually Forget these entries to remove them from the machine list. For servers where there are continually services registers and disconnecting it is possible to configure SimpleHelp to automatically forget services after some duration.

The SimpleHelp server will check services once per day and remove those that have been offline for longer than the specified duration.
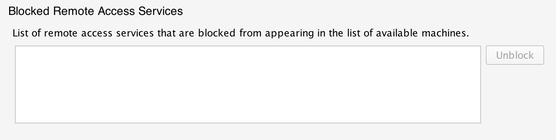
Blocking Remote Access Services
If a remote access service is continually registering with your server, and you wish to hide it, then you can select the service in the Access tab and choose the Block option. Once blocked, machines are listed in the following section, and can be unblocked if required:
Integrating SimpleHelp
In this section you can configure SimpleHelp to expose metrics and information which can be used for logging, reporting or integrating with third party software. The integration sections are shown below:

Configuring an Email Server
An outgoing email server must be configured in order for SimpleHelp to send notification emails to technicians, administrators and customers:

The following properties are required when configuring your server:
| SMTP Server Hostname | The hostname or IP address of your SMTP server. |
| SMTP Port | The port to use to send emails via your SMTP server. The defaults are 25 for non-secure transmission, and 587 for secure. |
| Username | The username of a user able to send email via the SMTP server. |
| Password | The password of the SMTP user. |
| Sending Email Address | The 'From' email address for sent emails. |
| Sending Name | The name or description of the sending party. |
| Server uses SSL/TLS | Check if the server uses SSL/TLS for security. |
SimpleHelp has a local store of trusted root certificates. Whenever a connection is made to a SMTP server over SSL SimpleHelp will attempt to create a certificate chain to a root that it trusts. If you are using a self-signed or internal SMTP SSL certificate you will need to add the trusted root certificate to the SimpleHelp store. To do this press the Manage Trusted Certificates button. SimpleHelp currently accepts X509 certificates, as well as PKCS7 (P7B) bundles.
Web API Configuration
The SimpleHelp Web API allows you to create meaningful integrations that perform HTTP queries against the SimpleHelp server to gather information and make changes. Each integration is assigned a unique API token that it can use to make these queries. The Web API is described in detail in our API Guide.
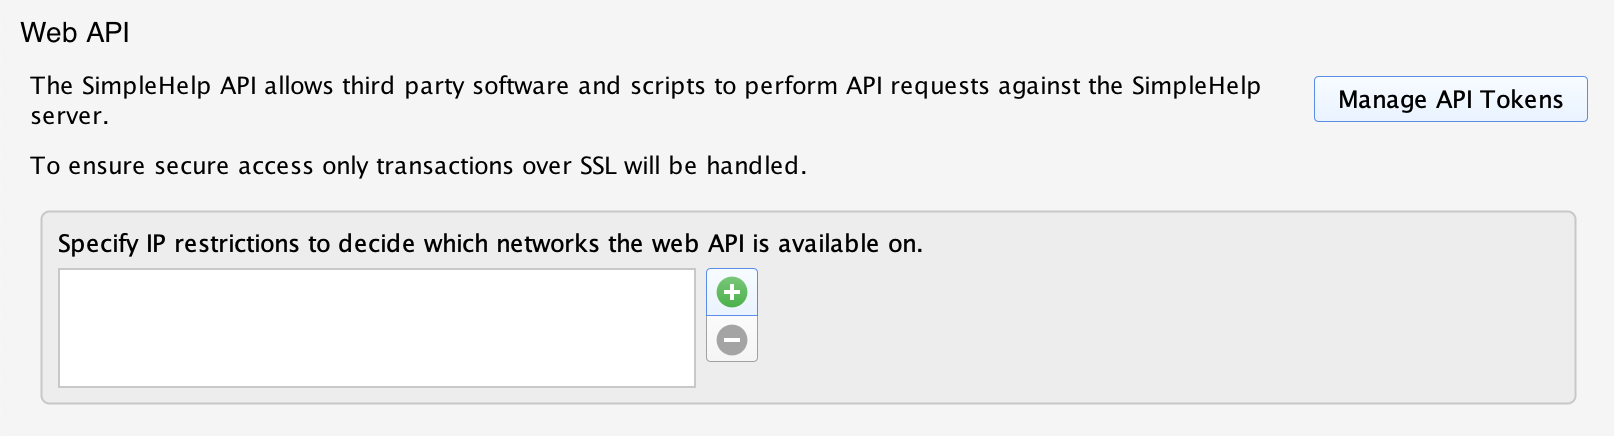
You can create a new API token or manage existing API tokens using the Manage API Tokens button. For additional security, specify incoming IP address restrictions that should be applied to queries to ensure that API access is further restricted to particular clients.
Exposing Server Metrics with the Status Page
SimpleHelp can be configured to expose internal server metrics. This information can be incorporated into your website to provide support information to customers or can be used for internal monitoring purposes. When enabled, SimpleHelp will respond to two HTTP additional queries:
- /techsloggedin - the server will return the number of logged in technicians.
- /statuspage - the server will return a body of XML formatted text similar to the following:
<?xml version="1.0" encoding="UTF-8" ?>
<simplehelp_metrics version="3.11" builddate="20111020-110852">
    <technician_metrics>
        <metric id="tech_logged_in" name="Technicians Logged In" value="3"/>
        <metric id="tech_in_session" name="Technicians In Session" value="2"/>
        <metric id="tech_in_remote_session" name="Technicians In Remote Session" value="1"/>
    </technician_metrics>
    <customer_metrics>
        <metric id="cust_logged_in" name="Customers Logged In" value="2"/>
        <metric id="cust_in_session" name="Customers In Session" value="2"/>
        <metric id="cust_waiting" name="Customers Waiting" value="0"/>
    </customer_metrics>
    <server_metrics>
        <metric id="server_max_sessions" name="Server Maximum Sessions" value="10"/>
        <metric id="server_average_queue_time" name="Average Queue Time" value="26516"/>
        <metric id="server_last_queue_time" name="Last Queue Time" value="26516"/>
        <metric id="server_average_session_time" name="Average Session Duration" value="58704"/>
        <metric id="server_last_session_time" name="Last Session Duration" value="58704"/>
    </server_metrics>
</simplehelp_metrics>
These metrics are automatically updated each time the server is queried.
Showing Technician Availability On Your Support Site
The server statistics page is particularly useful if you wish to notify customers whether a technician is currently logged into the SimpleHelp server. To simplify this, you can include a Javascript variable directly into your website by using the /techsloggedin?embed URL instead. Include this script in a web page of your choice using code similar to:
<script
     src="http://<YOUR SERVER>/techsloggedin?embed"
     type="text/javascript">
</script>
Then you can simply refer to the Javascript variable techsloggedin using the following JavaScript. In this example we display the text Available or Not Available but you can configure it to change your page in any way you choose:
<script type="text/javascript">
    if (tech_logged_in == 0)
        document.writeln('Not Available');
    else
        document.writeln('Available');
</script>
Once configured ensure that an email can be sent by pressing the Test Connection button.
Exporting Information from SimpleHelp using the Logging Framework

|
Since SimpleHelp v4.3, the Data Export and Logging section in the Administration tab has been moved to the Alerts tab. You can view the v4.3 Server Event Alerts documentation here.
|
Enterprise, Clustering and Simulation
See the Enterprise User Guide for information on Enterprise-specific features in SimpleHelp.
Additional Configuration
Changing Text and Translations used by SimpleHelp
The Branding section of the Administration console can be used to substitute the name SimpleHelp from text displayed in any SimpleHelp applications. If you wish to modify the text displayed further you can do so by specifying translation overrides using the following steps:
- Lets begin by assuming you wish to modify English translations (en.txt). If you wish to modify any other translations just substitute the appropriate file below.
- In the folder configuration/translations create a new file called en.txt. Make sure that the encoding of the en.txt file that you create matches the original in lib/translations.
- Translations are stored as KEY=VALUE pairs. You can adjust the value for any key by reproducing the pair in the substitute translation file you created in the configuration/translations folder. For example, to change the text Username to Technician Username in the technician login dialog you could use a replacement pair:
SERVER_USERNAME = Technician UsernameChanging Email Templates
SimpleHelp sends emails as part of its notification framework, and when technicians invite customers to join a support session. The templates for these emails are stored in the templates folder in the server installation directory. Templates are divided into the following sections:
- invitations - templates used by the server to send invitation emails.
- twotier - templates used by the server to send two tier authentication emails.
- access - templates used by the logging framework as default emails for remote access events.
- presentation - templates used by the logging framework as default emails for presentation events.
- support - templates used by the logging framework as default emails for support events.
- technician - templates used by the logging framework as default emails for technician events.
The templates within these folders allow you to customise the notification emails sent by the SimpleHelp server, and the technician and customer activity logs generated.
Templates specify variables that the server substitutes before the notification is sent. Variables within the template are delimited as ${...} where ... represents the variable name. The set of possible variables include:
Templates specify variables that the server substitutes before the notification is sent. Variables within the template are delimited as ${...} where ... represents the variable name. The set of possible variables include:
| ${Date} | the date-time of the event |
| ${Time} | elapsed time (length of session) |
| ${Technician} | the human readable technician name |
| ${CustomerInfo} | the classic list of all customer info, on a single line |
| ${...} | you can specify any customer collected details such as ${Name}, ${Company} ... |
Restricting the Set of SSL Ciphers Used
The set of secure or safe SSL ciphers is constantly changing. We anticipate that you will use your SimpleHelp server for an extended period of time, during which the set of safe ciphers may change. If you wish to prevent SimpleHelp from using a particular set of ciphers you can do by by following these instructions:
- In a text editor, edit the file acceptedciphers located in the configuration/sslconfig directory of your SimpleHelp installation.
- This file represents the ciphers that SimpleHelp will use. Remove any ciphers that you wish to prohibit, or add any new ciphers that you expect the server to handle.
- Restart the server for the changes to be picked up.
Backups and Restores
The SimpleHelp server will store all your personal settings and data in the configuration directory located in the server's installation directory. The data written to the configuration folder includes:
We recommend backing up your server's configuration regularly.
Restoring or migrating servers can be done easily by installing a new version of SimpleHelp on the new server and overwriting the configuration folder. Once the new server is started up all your old configuration settings will be restored.
- your server's configuration file
- your SimpleHelp license
- your server's security ID
- customised artefacts, like branding options, email templates, HTML pages etc.
- videos stored on the server
We recommend backing up your server's configuration regularly.
Restoring or migrating servers can be done easily by installing a new version of SimpleHelp on the new server and overwriting the configuration folder. Once the new server is started up all your old configuration settings will be restored.