 Remote Support
 Remote Access
 Monitoring and Management
 Presentation
 Remote Work
 Standard
 Business
 Enterprise


SimpleHelp Technician Guide
A comprehensive guide to using SimpleHelp as a technician. There are two ways to connect and log in to your SimpleHelp server as a technician:
- A desktop computer application, the Technician Console, which provides users access to all the features SimpleHelp offers. This guide covers its use and feature set.
- A web browser-based application, also suitable for mobile devices which lets you log in via your web browser. Please see our web-based technician console guide for details.
Technician Console
The Technician Console is a standalone application used by technicians to access the SimpleHelp server. Any technician can log in using the following steps:
- Open your web browser and navigate to the
/technicianaddress of your installed SimpleHelp server. - Download and run the SimpleHelp Technician application.
- Log in using your technician credentials.
- If this is the very first Technician Console connecting to your SimpleHelp server since the server was installed, you will be automatically logged in as the SimpleHelpAdmin user.
Logging in to SimpleHelp
When the Technician Console application is launched you will be presented with a login box:

To log into SimpleHelp a technician must provide a set of credentials. These credentials can be one of the following:
- The administrative username SimpleHelpAdmin and the server's configured administrative password.
- The credentials of a technician account configured in the SimpleHelp server.
- The credentials of a technician account that can be authenticated against a third party authentication server, such as an LDAP server.
Technicians can choose to remain logged in after closing the Technician Console by checking the Keep me signed in checkbox. The technician will remain authenticated until they explicitly log themselves out.
Technician Console Overview
Once logged in the technician will see the following Technician Console tabs unless they've been disabled for members of their Group:

The Technician Console has the following tabs in the top left:
- Support - the Support section is where on-demand Remote Support sessions are started and managed. Here you can join customers in the Support queue, and create and send Support session invitations.
- Access - the Access section is where unattended Remote Access sessions are started, and where remote machines are managed and monitored. This includes the configuration and management of Remote Access services.
- Alerts - the Alerts section is where monitoring and server event alerts are managed. Here you can configure the SimpleHelp server react to remote machine monitoring data or internal server events.
- History - shows your server's session history. You can use filters, extract reports and open a visual dashboard to view session activity.
- Toolboxes - configure tools that can be run on remote machines from within a session, or via the Access tab. See our ToolBox Guide here.
In addition, these tabs in the top right:
- Administration - The administration section contains the configuration settings of the server. The usage of the Administration console is outlined in our Administration Guide. The Administration section is only accessible to the SimpleHelpAdmin administrative technician and technicians who are members of a server administration group.
- Notifications - Show notifications from the SimpleHelp server about monitoring events, suggestions, server performance and new releases.
- Options - Opens the menu offering the screen sharing utility, your user preferences, a link to our online guides and the log out button.
Remote Support
The Support section is the centre for managing remote support sessions:

It is split into two subsections:
- The top half will show the queue of waiting on-demand Remote Support users visible to this technician.
- The bottom half lists any existing active support sessions between a technician and a customer.
The columns displayed can be customised in the Administration tab's Customer Details section.
Support Queue
Double-click on a waiting customer to start a Remote Support session to their machine.
Open the details bar to see more information about the remote machine.
When you start a Remote Support session here, it will move to the Active Sessions panel below.
Active Sessions
Here you can see active sessions, their duration, and which Technician is currently connected.
If you select an active session and your account has adequate permissions, you can join the session or terminate it in the details bar.
Invitations
Invitations are preconfigured sessions whose details are stored within the SimpleHelp server. Technicians can then provide customers with access codes or links to preconfigured Remote Support executables. With these you can make Remote Support executables customer-specific and already contain all the customer's details so the customer need not enter them.
To create an invitation click the Invite button. The following dialog will appear:

All visible invitations stored on the server are listed and include the customer's name, the date of creation and the SimpleHelp technician who created it.
The technician can perform the following actions:
- Create a New Invitation - create and configure a new invitation. The invitation is stored on the server and used whenever a session is created with a matching invitation code.
- Send - invitation codes can easily be distributed to customers to invite them to join the SimpleHelp queue.
- Edit - once an invitation has been created it can be edited using this button in order to change any configurable properties without changing the invitation code. Therefore, customers can still use the same invitation to connect but will be assigned the updated details once in the queue.
- Delete - delete an invitation to remove it from the SimpleHelp server.
Creating and Configuring Invitations
When the technician clicks on the Create a New Invitation button they are presented with the following dialog:

The configuration of an invitation involves selecting appropriate invitation options and entering in the details of the customer to whom this invitation is to be sent. Invitation options include:
- Customer can connect to - select the technicians that this customer will be visible to. Options include all technicians, this technician only, or any other technician in the same group as this technician.
- Invitation expires - specify whether this invitation should expire after some time or after a set number of sessions.
- Share invitation with - choose whether to share this invitation with all other technicians, other technicians in the same group, or no other technicians.
The list of customer details match the information fields to be collected as specified in the Administration tab.
Sending Invitations
Invitations can be sent to customers via email by the SimpleHelp server or invitation specific links can be utilised by the technician. By clicking the Send button the technician will be presented with the sending options:

The relevant information and actions are split into three sections:
- Invitation Code - view the invitation code or copy it to the clipboard.
- Connection Link - view the invitation link that customers can use to establish a connection using the invitation.
- Email Invitation - send an email from the SimpleHelp server to a customer inviting them to start a session.
Remote Access
The Access tab lists all Remote Access Services that are registered within your SimpleHelp server, from here you can monitor remote machines and establish a session to one if required:

Remote Access services by default are placed in the All Machines section, but can be moved into subgroups. To view all groups under the All Machines section press the chevron beside the icon:
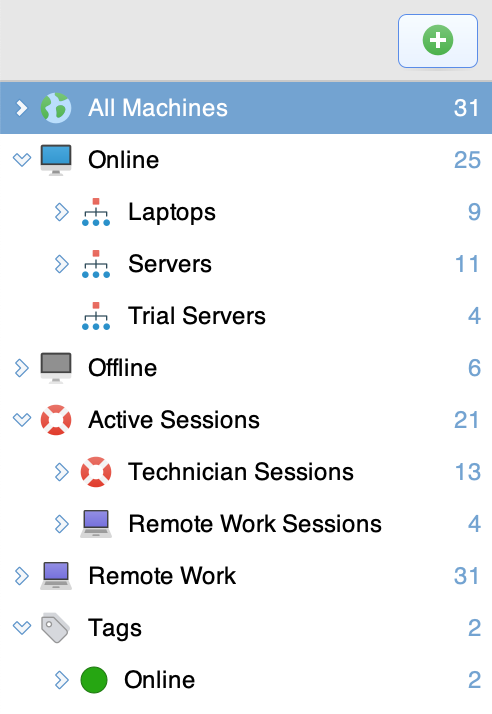
You can add a new group at any time by pressing the green + button at the top. Below the All Machines section are the Online, Offline and Active Sessions sections. The online section contains all the machines in All Machines that are currently online, while the Active Sessions section contains all machines that have at least once session connected. Additionally, if there are offline machines a separate Offline section will appear.
You can move machines between groups by selecting the machines to move from the list of machines and dragging them onto a group. This can still be done even if the machines are currently offline.
Machine Views
Machines for a selected group are shown on the right in the machines view. There are currently three views for machines: Machine List View, Machine Grid View and Remote Work View. All views have a control bar near the top similar to the following:

| X | X |
|---|---|
 |
Toggle between the list, grid and remote work views. |
 |
Show or hide the machine details panel that appears below the machine views, and toggle to a three column layout. |
 |
Create a preconfigured Remote Access Service installer to easily add new machines to your access list. |
 |
Export machine details as a CSV report. |
Machine list view
In the machine list view machines are shown as a vertical list of entries. Key information about the machine is shown to the right of the machine name, including the hostname, currently logged on user, IP address as well as CPU and memory usage information.

Machine grid view
The grid view provides a visual overview of your machines. When using the grid view a technician can see multiple machine screens at the same time. This is particularly useful when attempting to visually identify a window or application on a number of machines.
In addition to the screenshot, the machine's CPU and memory usage is displayed as well as the currently logged on user.

Remote Work view
The Remote Work view is very similar to the machine list view. A list of machines is presented, but instead of showing the Username, Hostname and IP columns the Remote Work view instead shows Remote Work specific information, such as the email address of the user associated with a particular machine and the date it was last accessed in a Remote Work session.
Remote Access service status labels
In the machine views list, and in the machine details panel, a status icon is used to describe the current state of a Remote Access service. The status icons currently used by SimpleHelp are:
| X | X |
|---|---|
 |
The Remote Access Service is online, and not currently in use. |
 |
The Remote Access Service is online, and the remote user is currently using it. |
 |
The Remote Access Service is online. If the icon is simply blue then the remote machine is in use. If a number is present then this signifies the number of remote access sessions that are currently active. |
 |
The Remote Access Service is online. Both standard technician sessions and remote work sessions are active. If a number is present then this signifies the number of remote access sessions that are currently active. |
 |
The Remote Access Service is offline. |
 |
The Remote Access Service is online, but the service version is older than the server version. Choose the Update Service option to update the service. |
 |
The Remote Access Service is online but is a very old version, and is in need of an upgrade. Choose the Upgrade option to upgrade the service. |
An empty box symbol indicates the service has registered but not yet sent any status information.
Filtering the Machine Views
SimpleHelp can display thousands of Remote Access Services so there are two filtering modes to help you locate specific machines.
| X | X |
|---|---|
 |
Text Search - text you type into the search field will be used to decide whether machines are included based on if the text entered is included in the machine's details. |
 |
Query Search - (Introduced in 5.4) specify a search query that will be evaluated on each machine to decide whether it should be included or not. |
See the Query Search guide for advanced filtering using variables and operators, as well as some example queries.
The Text Search allows you to find machines just by typing in some text that may appear in their machine name, group name, or associated information. To filter the list of machines start by typing in a search phrase into the search field, as shown below:

Here, I have filtered the list using the text Windows. If you no longer wish to filter the list you can clear the filter by pressing the clear button in the search field.
Saving machine filters
If you find that you are continually filtering the machine list then it may be easier to save the filter in order to avoid having to search for it again. You can save a filter by pressing the white pin icon beside the search results group:

The saved filter will then appear below the group hierarchy:

To delete a saved filter select the filter and click the white cross on the right of the filter name.
Machine Details
When a machine is selected in the list or the grid view, the machine details panel is populated, as in the screenshot below:

Primary actions, such as the ability to connect to a machine, are included in the details toolbar at the top of the panel. The contents of this toolbar change depending on whether the machine is online or offline. The toolbar contains the following actions:
| X | X |
|---|---|
 |
Click the Connect button to establish a remote access session to the remote machine. The connect button is only presented when the machine is online. If you wish to establish a session that starts in a different mode, or if you wish to request a connection to the selected machine, use the drop-down menu shown when pressing the down arrow on the right: |
 |
If this Remote Access Service version is very old then you will need to upgrade it before you can access this remote machine. Press the Upgrade button to upgrade the service immediately. |
 |
When a machine is offline it cannot be connected to, so the Connect button is replaced with a Wake-On-LAN button. Wake-On-LAN sends a special data packet to the machine, routed via another Remote Access Service on the same remote network. If the remote machine supports Wake-On-LAN and it receives the special data packet it will wake up and register again with the SimpleHelp server. |
 |
Run a tool from your toolbox on this machine. A tool is a command that is executed on the remote machine. Before executing the tool will copy across any files or other resources required to execute, and will return a result when done. |
 |
Switch the details panel to show overview information of the selected machine. This information includes:
|
 |
Switch the details panel to show the remote file transfer view, allowing the technician to copy files and folders to or from the remote machine without the need to start a remote control session. |
 |
Create an app tunnel to the remote machine. See our App Tunnel Guide for more information. |
 |
View a history of sessions to this machine. |
 |
Switch to the notes view in order to store machine-specific notes. The notes view is split into two sections:
|
 |
The advanced panel includes all the advanced configuration actions for this Remote Access Service that should only be required infrequently. We detail the advanced actions below. |
 |
Show a set of URLs that are specific to this machine. When using the URL the technician application will connect directly to this machine, and will not show the Technician Console. |
 |
Favourite this Remote Access Service. If you have many services, but use a subset frequently, then you can favourite the ones you need quick access to. Favourite Remote Access Services appear in the machine group hierarchy on the left of the Access tab. |
As of SimpleHelp v4.4, Remote Access Services will report CPU and Memory load averages for the past 1, 5 and 15 minutes. These allow the technician to better understand how the machine has been performing over a longer duration.

Remote File View
Remote File View (distinct from the File Transfer session mode) allows you to:
- Explore the remote machine's directories
- Generate a disk space usage report of the current directory
- Download copies of files from the remote machine
- Rename and delete files and folders
- Create new folders to retrieve files from, or send files to the selected remote machine through the Access tab without needing to start a session.
To download a copy of a file, click the download button to pop open the download pane, click and drag the desired file from the remote file view pane into the download pane, then click and drag the downloaded file out of the Technician Console onto your local desktop or desired folder.
Connecting to Specific RDP Sessions
The Connect button in the button bar will establish a connection to the console of the remote machine. If the remote machine is a Windows server that is hosting multiple RDP sessions then a technician can see what sessions are currently running on the server in the details panel:

If you wish to connect to a particular RDP session you can do so by pressing the Connect button for that particular session's row.
Connecting to a Terminal
If you wish to connect to a remote machine purely for terminal access then you can do so by starting a terminal session. Press the down arrow beside the Connect button to expose the list of alternative connections:
The Connect in Terminal Mode option will result in a session window that contains just a terminal connected to the remote machine.

Note that terminal sessions will consume an active session like a standard remote access session.
Machine URLs
URLs for a machine are shown (using the blue orb button detailed above), the following set of URLs will drop-down from the button bar in the details panel:
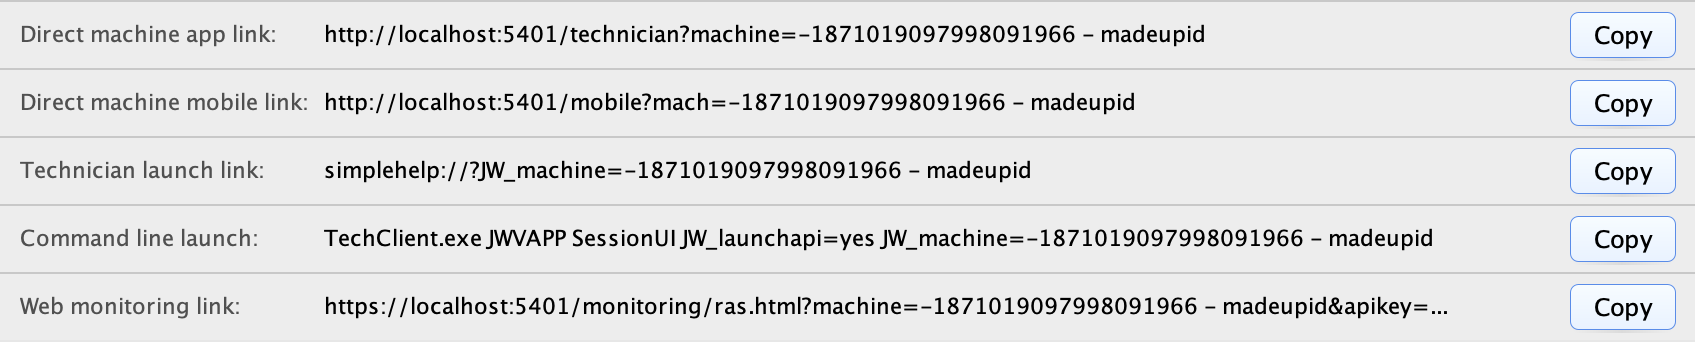
There are currently three types of links to this machine:
- Direct machine link - the URL allows you to download a version of the technician application that connects directly to this machine, bypassing the Technician Console.
- Technician launch link - a local machine URL that starts a session to this machine.
- Command line launch - a command line launch that will start a session to this machine.
- Web monitoring link - tracking monitoring metrics for this machine from within a web browser.
Managing Remote Access Services
In this section you will find out how to manage your Remote Access Services once they are registering with SimpleHelp. This includes how to organise the machines into groups, how to rename machines, how to reconfigure services, and all the advanced actions you can invoke on services.
When a machine is selected the Advanced panel, shown when the cog icon is pressed, is populated with a set of actions that can be invoked to manage the service.
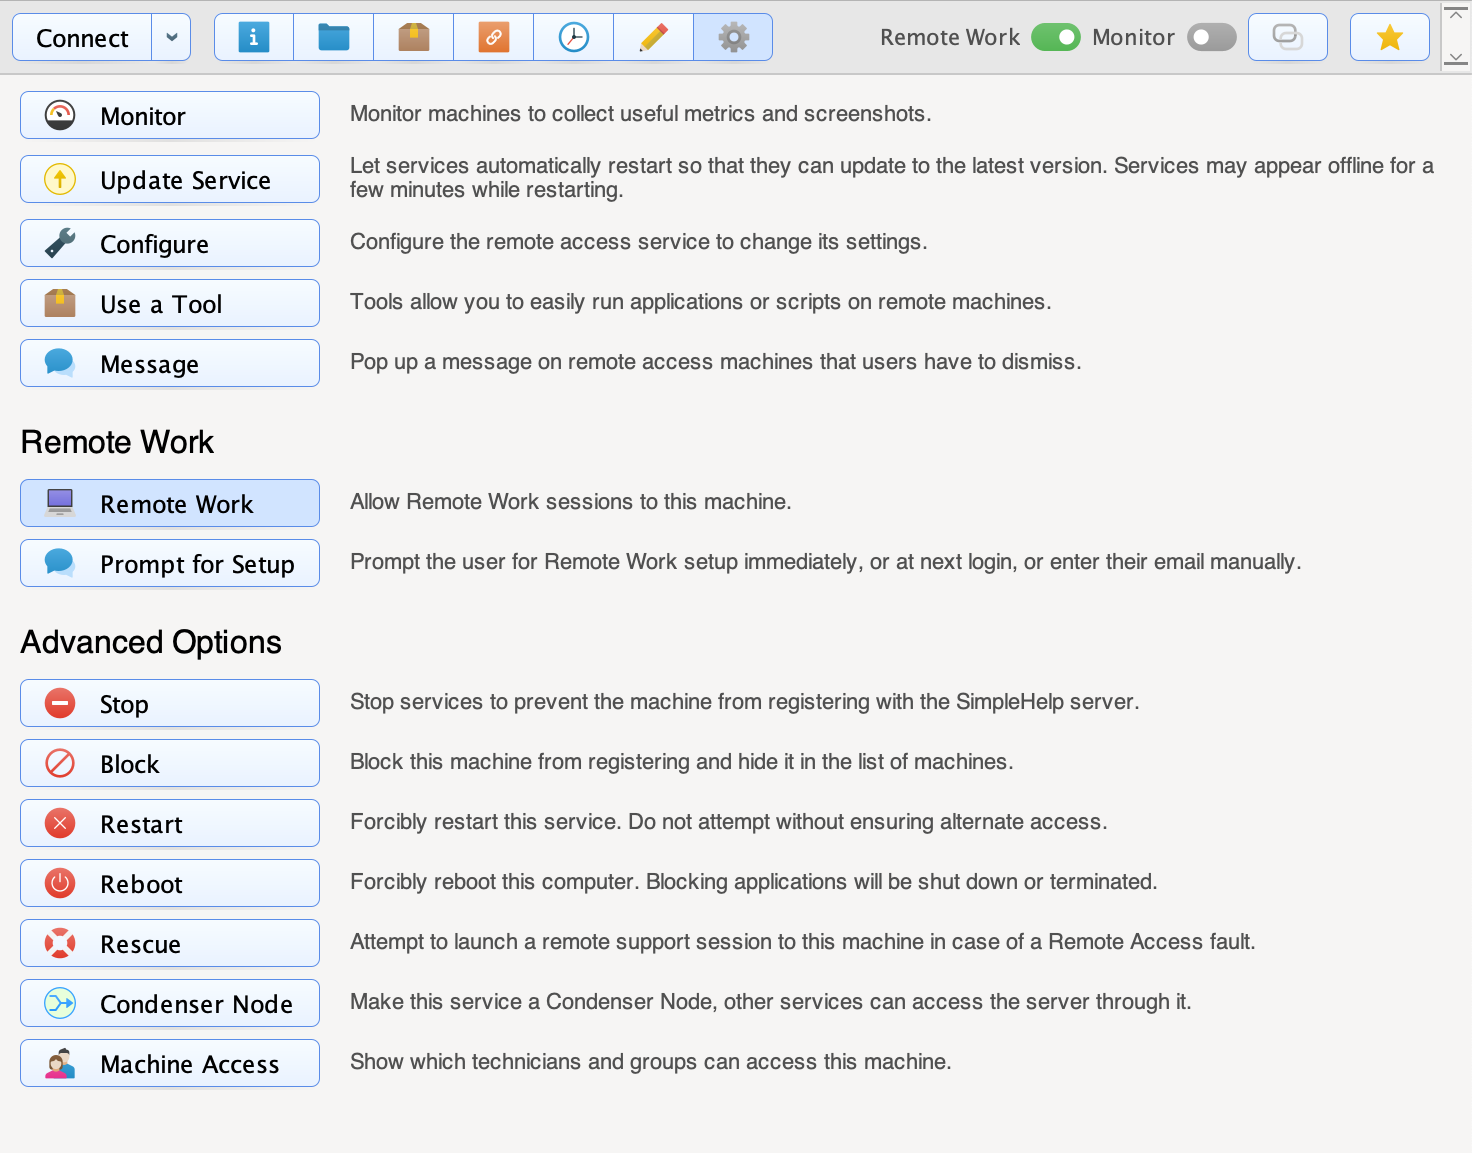
The following actions can be invoked on a service:
- Monitor - enable or disable monitoring for this service.
- Update Service - this service is an older version than the SimpleHelp server. Enable Update Service to have the service update itself to the latest version.
- Configure - show the service configuration, allowing the technician to reconfigure settings that were originally set when the service was installed.
- Use a Tool - run a tool from your toolbox on the remote machine.
- Message - send a message to the user of this remote machine.
- Remote Printing - if enabled, the remote machine will support remote printing through a session.
Remote Work actions include:
- Remote Work - enable this machine for Remote Work usage.
- Prompt for Setup - show a prompt on the remote machine to set up Remote Work.
Advanced Options provide additional controls for services, depending on whether the selected machine is currently online or offline:
- Forget - offline services will continue to appear in the access tab until they are forgotten. If a forgotten machine comes back online, it will reappear in the list of machines again.
- Upgrade - this service is very old and needs to be upgraded before it can be accessed.
- Stop - stops and instructs the Remote Access Service on the machine to uninstall itself. This will automatically Forget the machine to remove it from the machine list
- Block - block this Remote Access Service from registering and stop it appearing in the Access tab. Blocked services can be unblocked at a later date via the Administration tab.
- Migrate - Remote Access Services are configured to connect to one or more SimpleHelp servers. If the address of your SimpleHelp server is going to change, then you can migrate services from your old server address to your new server address using this action.
- Restart - forcibly restart the Remote Access Service on the remote machine.
- Reboot - reboot the remote machine.
- Rescue - instruct the Remote Access Service to start a Remote Support session from the remote machine. This is useful in situations where the service isn't able to facilitate a session, but is able to respond to action requests.
- Condenser Node - set this Remote Access Service to be a condenser node. Other services will then be able to register directly with this service and no longer need to communicate with the server directly.
- Configuration Analysis - reports the server URLs your Remote Access Services are registering with, and the protocol used. This is useful to validate the protocol and address combinations in use before and after migrations, for example. This doesn't gather data from offline machines, or machines that have a session connection password set. For offline machines, use a machine query for registrationURL.
- Machine Access - produce a report indicating which Technicians and Technician Groups have access to this machine.
For offline machines, Queued Actions will be executed when the machine next comes online:
- Update Service - the remote machine will update if required and restart on the new version
- Use a Tool - the Tool will run when the machine comes online
- Schedule Stop - issues a Stop instruction when the machine comes online.
- Migrate - issues the Migrate instruction to the remote machine when it comes online. Note that since the machine needs to come online to receive this instruction, if you migrate your server to another address before then you may lose remote access to the machine.
Moving Machines into Groups
To move a machine, or a group of machines, into a new group you should follow these steps:
- If the group does not exist already exist then you can create one by pressing the green + button at the top of the machine group hierarchy.
- Select the machines that you wish to move in the machines view. Once all the machines are selected, drag them into the group.
Batch Service Management
When a single machine is selected, the details view can be switched to the Advanced panel by pressing the cog icon. The user is then presented with a set of actions that can be invoked on this service. You can control multiple machines by selecting them. The actions panel then changes appropriately:

Not all actions can be applied to all services. The number of services that an action can be applied to appears in brackets.
Upgrading and Updating Services
Whenever the SimpleHelp server is upgraded the server version and the version of any existing Remote Access Services will differ. If the Remote Access Services are very old (v3 or earlier) then they will need to be upgraded before they can be accessed. You can upgrade machines by pressing the Upgrade button as described above. Newer services (v4 or later) can be instructed to automatically restart by choosing the Update Service option.
Monitoring
SimpleHelp includes a comprehensive monitoring framework that collects data from Remote Access Services even when a session is not running. Much of the information already shown in this guide, such as remote screenshots, CPU and memory usage, networking information and more, form part of the data returned when a machine is monitored.
Machines can be monitored by flipping the monitor switch in the machine details toolbar:

You can enable or disable monitoring for an entire group by switching the monitoring switch in the group title in the machine list view, or by selecting multiple machines and switching the advanced Monitor button.
Screen Sharing Presentations
Remote support and remote access sessions allow a technician to view a remote user's desktop. If, however, a technician wishes to share their desktop with multiple users then they can create a Screen Sharing session. Each technician may start a single session at a time after which attendees are able to join and view the technician's desktop in a web browser.
Starting Screen Sharing
To begin Screen Sharing select the accounts menu and choose the Screen Sharing option:

The Screen Sharing interface will then appear near the bottom of the Technician Console window, allowing you to easily control your screen sharing session:

To start a screen sharing session press the Share Screen button. The session will immediately begin, and your local screen will be captured and shared through the SimpleHelp server.
Configuring Screen Sharing
The Configure button can be used to configure your Screen Sharing session:

| X | X |
|---|---|
| Name | Set the name of the session that will be shown to anyone viewing your screen share. Press the lock icon to save this setting for future sessions. |
| Password | Password protect access to the screen sharing session. Press the lock icon to save this setting for future sessions. |
| Private Presentation | If checked, your screen sharing session will not be visible to anyone without a screen sharing link. |
Joining Screen Sharing
Technicians can use the Copy Link button:

to retrieve a link for their screen sharing session. The link will allow attendees to join the session.
Session History
SimpleHelp keeps track of every remote support session, remote access session or screen sharing session that is started. You can see a list of recent sessions in the History tab:
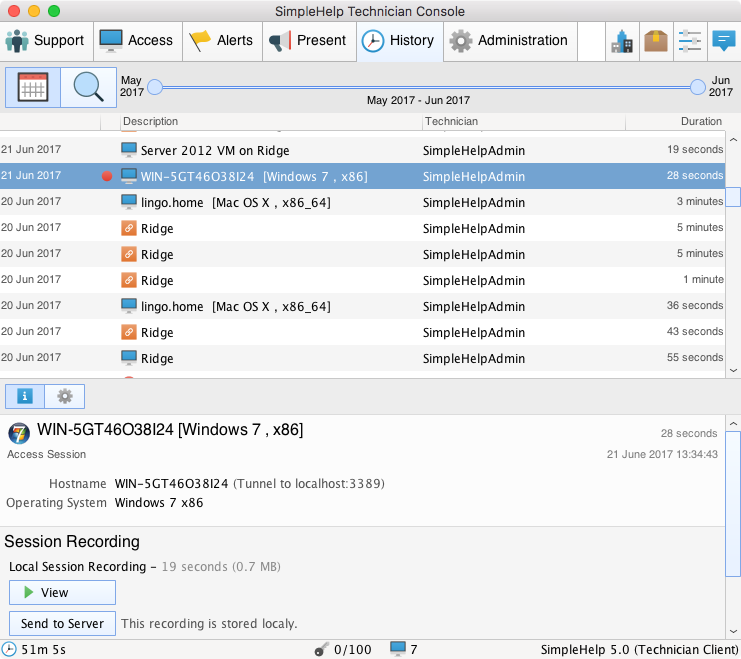
The history tab is separated vertically into two sections: the list of sessions above and session details below. When initially opened sessions will be listed chronologically, with the most recent session at the top. It is possible to filter the listed sessions by selecting a date period using the date slider, or alternatively by switching to the filter view:

When a session is selected the details panel is populated with information about the session. This includes:
- Basic session information including the session type, duration and date.
- If the session is a remote support session, the customer details are included. If it is a remote access session, the machine details are listed:

- If the technician left any comments at the end of the session they will be included.
- A complete transcript of the in-session chat is included.
- If a session recording was taken, the session recording details will be listed.
Managing Session Recordings
When a session is recorded the recording is stored locally on the technician's computer. When the session is complete the technician can view the recording details in the History tab. Sessions that have been recorded have a red circle beside the session name in the session listing:

Select the session to see the recording details below:

The following actions can be taken with session recordings:
- View - view the session recording in a playback window. If the recording is stored locally then it will be played immediately. If it is stored on the server the video will be downloaded first and subsequently played.
- Send to Server - recordings that are stored locally can be sent to the server. Once the recording has been transferred to the server the local copy is deleted. If your server is set to automatically encode uploaded recordings then the encoding process will start automatically.
- Queue for Encoding - instruct the server to encode this session recording.
- Copy Link - once a recording has been transferred to the server and encoded it can be viewed in any web browser. Use Copy Link to copy the link to the recording into your system's clipboard.
- Delete - delete the recording from the local machine or from the server.
- Password - by default SimpleHelp allocates a randomly generated URL to server-stored recordings. This prevents anyone from guessing the recording URL, but it is still accessible to the public should they know the URL. Set a password if you wish to restrict access to this session recording.
Session Encoding
Session recordings are captured in an internal format that is very similar to how session data is sent between the technician and remote machine. This allows the Technician Console to capture recordings efficiently. The SimpleHelp server is able to encode these recordings into a standard WebM format that can be viewed in most web browsers and video playing software.
By default, SimpleHelp will not automatically upload or encode recordings. This default behaviour can be changed in the Administration Tab.
Encoding is very resource intensive. The SimpleHelp server will not encode at full resolution, or may not attempt an encoding at all if it has insufficient memory in which to do so. Increasing the server's allocated memory limit in the Server Health Section of the Administration Tab will allow the server to encode larger sessions at higher quality.
Exporting Session Information
Select multiple sessions in the history listing and choose the Export to CSV option to export the session data in CSV format.
ToolBox
Documentation for ToolBox functionality within SimpleHelp can be found in the ToolBox Guide.
Technician Preferences
Technician preferences allow the technician to configure various aspects of future SimpleHelp sessions. The set of preferences are split into three sections.
Technician Account Settings
The technician account preference page displays the technician's account details and lets the technician set a customised avatar image.
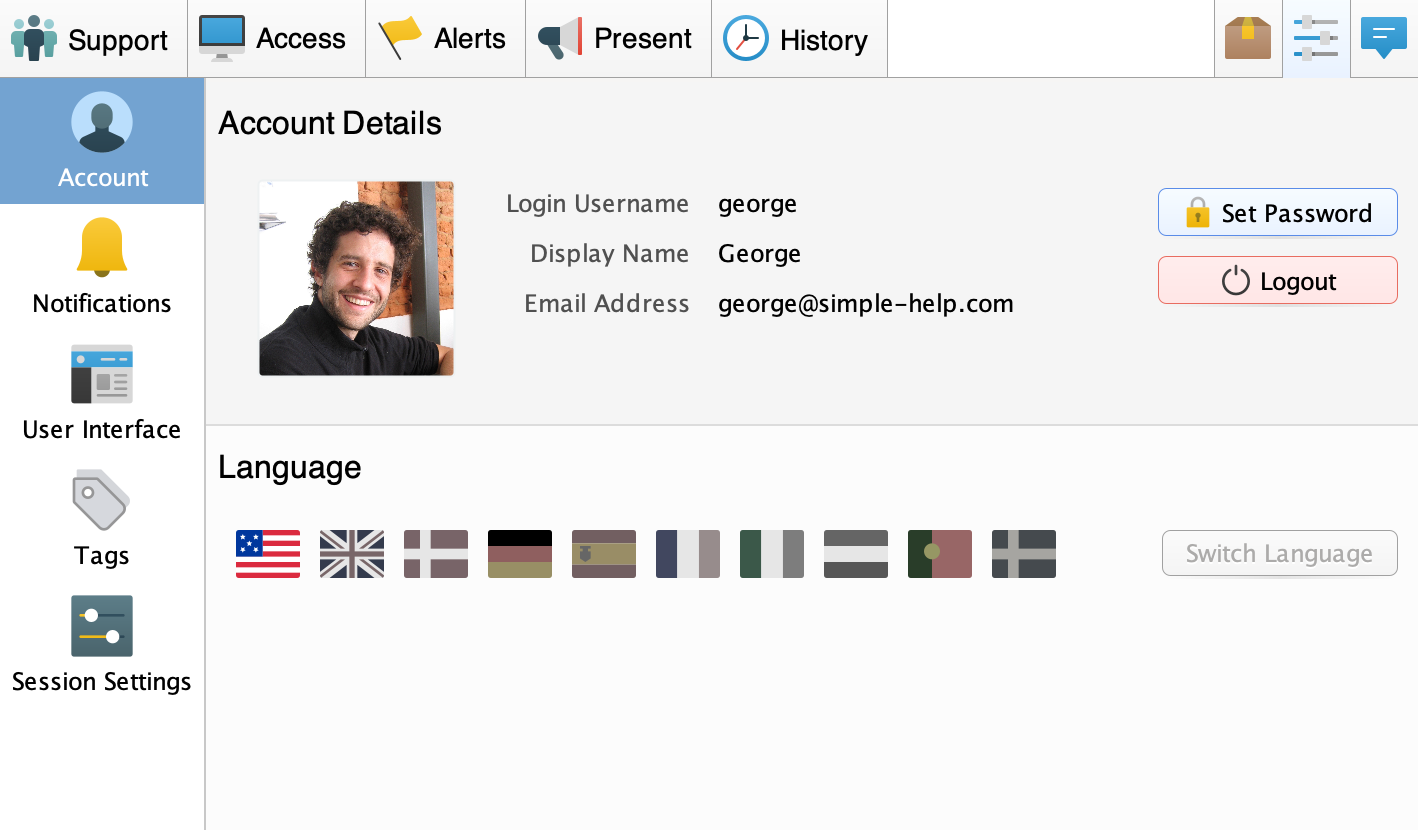
To set an avatar image, click on the image in the account section. A file chooser dialog will appear to let the technician select an avatar image. Any avatar image selected will be uploaded and stored on the server. Note that avatar images cannot be set for the SimpleHelpAdmin administrative user.
To clear the set avatar image hover the mouse over the avatar and click on the close button as shown below:

Notification Preferences
The technician can configure SimpleHelp to notify them of certain events, such as when a new customer joins the waiting queue. The notification preferences page lets the technician configure these notifications:

The notifications are split into three groups:
- System Tray Notifications - add an icon into the system's system tray or task bar and choose the conditions under which the technician must be notified of customer activity: when a customer joins the queue, leaves the queue or both. When no customers are in the queue the icon will be blue and will become red when a customer is waiting.
- Audio Notifications - the technician application can play sounds to notify the technician of customer queue activity, as well as when a new chat message arrives. These are configured individually in the audio group.
- Popup Notifications - popup notifications are small windows that appear on the technicians display when customer activity changes.
User Interface Preferences
The user interface preferences let technicians customise the layout and functionality of the session window and of the Technician Console.

The following user interface options exist for new sessions:
- Use tabs for multiple sessions - if enabled, sessions are collected into a single tabbed window.
- Show the chat panel - enable to show the right chat panel by default when a new session starts.
- Show the button menu - enable to keep the button menu present, and disable to hide it and have it drop-down. The delay before the menu drops down is configured as the Drop down delay below.
- Enable control - choose whether control is enabled by default in a new session.
- Enable text echoing - if enabled, typed text is displayed at the bottom of the session window.
- Show recording shortcuts - enabled to show recording controls in the chat panel.
- Set session window size - sets the size of a new session window.
- Default scaling mode - choose how the remote screen is scaled within a new session window.
- Default Remote Access connection - choose what mode a new session is started in.
The following options exist to control the Technician Console:
- Use dark mode - enabled to use the Technician Console and Session user interface in dark mode.
- Default application scaling - control how the user interface elements are scaled. SimpleHelp will automatically detect an appropriate scaling factor, but this can be customised if desired.
The following Advanced options exist:
- Automatically reconnect the Technician Console - if enabled, the Technician Console will attempt to reconnect to the SimpleHelp server once disconnected. This can be disabled, in which case the technician must manually invoke a reconnect after a disconnect.
- Show close session confirmation for Remote Access sessions - if disabled, the end of session dialog is not shown when a Remote Access Service window is closed.
- Request access message - control what message is shown to the remote user when a technician requests access to their machine.
Tags
Tags are labels that can be applied to Remote Access Services to more easily categorise and manage remote machines. The set of tags that can be applied is configured in the Tags section of the Preferences tab:

The New Tag button can be used to create a new tag. The new tag will be stored on the server and will be available to all technicians. Additionally, any existing tag can be renamed by double clicking on the tag, and the colour can be changed by clicking on the tag's colour.
Default Session Settings
SimpleHelp sessions have a settings panel that contains a list of switches to configure or perform actions in the session. The Settings preferences page lets the technician decide the initial state of these tools, allowing subsequent sessions to be initialised exactly as desired.
The tools are shown as they are in the session user interface, and can be toggled on or off to set their initial state:

For more information on what each setting does see the Session Settings section below.
Session User Interface
When a technician connects to a remote support customer or to a remote access machine the session user interface is displayed:

The SimpleHelp Session User Interface has three main modes: remote desktop, file transfer and diagnostics. Each of these modes customises the session user interface to show mode-specific controls and actions. At any time the technician can switch between modes by clicking one of the three mode buttons:

Remote Desktop Mode
The remote desktop mode allows the technician to see and interact with the remote desktop. It is split into three components:
- Remote Desktop View - the remote desktop view shows the desktop on the remote machine being connected to.
- Button Bar - button bar allows the technician to perform various functions while using the remote computer by clicking one of the buttons.
- Chat and Tools Panel - the chat and tools panel contains the text correspondence sent between the technician and customer, and a tools panel of configuration settings that can be used to tune the session.
Remote Desktop View
The remote desktop view contains the desktop of the remote machine. Technicians can easily interact with the remote machine by clicking and typing into the remote desktop view as though it were their local computer.
If the desktop view is smaller than the remote desktop, scrollbars appear that allow the technician to change which portion of the desktop is being viewed. Alternatively, for quick scrolling, the technician can hold the ALT key while left-clicking and moving the mouse to easily move to a different location on the remote desktop.
By default the zoom level of the remote desktop is one-to-one: everything is the same size as it appears on the desktop. You can adjust the zoom level by using the zoom controls in the button bar, described below.
Chat and Tools Panel
The chat panel contains brief session information above the current chat transcript. Both the hostname and connect labels can be expanded to expose additional information about the remote host and connection.
| X | X |
|---|---|
 |
  |
Controlling the Connection Type
The connection settings drop-down allows you to control the colour fidelity, update speed and connection type for this session. Colour fidelity is the number of colours that SimpleHelp should transmit from the remote machines. The fewer colours, the better the data will compress and the faster your experience will be. Update speed dictates how quickly SimpleHelp should attempt to send new updates. High update speed uses more bandwidth, but provides a better experience.
The connection type allows you to switch how the session sends data to the remote machine. SimpleHelp will attempt a variety of connections when a session starts. The following table gives information on each connection type, and when it is appropriate:
| X | X |
|---|---|
| TCP | A TCP connection is the most common connection type that SimpleHelp will use, and is best for most networks and connections. If your server or remote machine is on a high latency connection then a UDP connection might be better. |
| UDP | Good for high latency connections where TCP introduces significant delays. |
| Direct TCP | A peer-to-peer TCP connection. This is the best connection method but is not often available as it requires that the technician is able to directly connect to the remote machine. |
| Direct UDP | A peer-to-peer UDP connection. It is not always available as it requires that the technician is able to directly connect to the remote machine. |
| HTTP/S | Some security appliances block non-HTTP connections. In this case SimpleHelp will proxy session data over HTTP/S. An HTTP connection will be attempted when a TCP connection fails. |
If your session is experiencing high latency or packet loss we suggest switching from TCP to Server UDP or Direct UDP.
SimpleHelp will always attempt to create a TCP connection before trying an HTTP connection. If you wish to use the same connection type the next time a connection is made you can pin the current settings.
Customer Chat
Technicians can chat with the customer by entering text into the message field and clicking Send to send the message. The technician can easily grab the remote user's attention by clicking the bell button resulting in the remote user's chat panel moving to the front of all their windows with the latest message highlighted in red.
Session Settings
The Settings panel contains a set of settings and actions that can be toggled during a running session:

Blue tools are on, or have been invoked, while greyed out tools have not. See the section Session Settings for more information on the function of each setting.
Session Button Bar
The button bar contains the following buttons and controls:
| X | X |
|---|---|
 |
The session mode controls. Switch between remote desktop, file transfer or diagnostics. |
 |
The screen refresh control. When toggled on the remote desktop will update, and when off screen updates will be paused. |
 |
Toggle whether control is sent from the technician to the remote machine. When toggled on technician controls such as mouse movements and key presses are sent to the remote machine. |
 |
It is useful for the technician to instantly see what typed text is sent to the remote machine. Enable text echoing to see an instantaneous copy of text that is typed. |
 |
Enter or exit full screen mode. In full screen mode, the button bar retracts to show the entire desktop. To show the button bar move the mouse to the top of the monitor and it will appear. |
 |
Send the Ctrl+Alt+Del sequence to a remote Windows machine. |
 |
Show the clipboard menu. Options are to copy the local clipboard to the remote machine, or pull the remote clipboard to the local machine. Additionally, the local machine's clipboard contents can be sent to the remote machine as a sequence of key presses. |
 |
Shows the keyboard menu, allowing the technician to decide how keys should be sent to the remote machine, and to send specific key combinations that cannot be created using their current keyboard mapping. |
  |
Screen controls to allow you to pick a remote display, or to scale the current remote desktop view. |
 |
Show the tools menu. Session actions are detailed below. |
Sharing Clipboard Contents
The clipboard menu drops down when the clipboard button is pressed in the session button bar. The resulting menu is shown below:

The menu allows the technician to synchronise and manage the state of the local and remote clipboard. Managing the clipboard is useful in situations where the technician wishes to copy text on the local machine and paste it on the remote machine, or vice versa. The menu option Send Clipboard Contents instructs SimpleHelp to send the technician's clipboard contents to the remote machine. Once this is complete the technician or customer can invoke a paste on the remote machine. The reverse option Fetch Remote Clipboard Contents instructs SimpleHelp to fetch the customer's clipboard contents, and make it available on the technician's machine to paste.
SimpleHelp will also automatically send or fetch clipboard contents if the technician invokes a Cut, Copy or Paste using a keyboard shortcut (Ctrl+X, Ctrl+C, Ctrl+V or Cmd+X, Cmd+C, Cmd+V). For example, if the technician chooses to copy something from the customer's machine, they will send a Copy keyboard shortcut which SimpleHelp will detect and subsequently automatically fetch the remote clipboard contents. The result is that the technician can immediately paste the result on their local machine without having to transfer the clipboard contents beforehand.
When a session ends the remote clipboard is cleared to prevent sensitive text being present.
In situations where a paste isn't possible SimpleHelp can simulate the typing of text. To type out the text present in the clipboard use Send clipboard as typed text and to type out the value of an associated machine property use Send machine property as typed text.
Sending Keys and Characters
The keyboard menu drops down when the keyboard button is pressed in the session button bar. The resulting menu is shown below:

SimpleHelp allows the technician and customer machines to use different keyboard locales. For example, the technician may be using a US English keyboard, while the customer may be using a French keyboard. In this situation the technician may wish to type English characters, French characters, or both. The keyboard menu allows the technician to switch between two keyboard modes in order to easily send the correct text to the customer. There are three options:
- Map Local Key Presses To Remote - in this mode, the technician's keystrokes are sent to the customers machine. The keystrokes are codes that represent which keys were pressed. On the customer's end these codes are mapped using the customer's keyboard locale into appropriate keys. If the local and remote locales differ then it is possible that the resulting characters generated will differ too.
- Map Local Text Typed To Remote - in this mode SimpleHelp sends the text that the technician types rather than the keystrokes. This mode will more accurately reproduce text across different locales, however it will not work correctly for keys that generate no text (such as the arrow keys). Use this mode to send text when sending keystrokes fails to produce the correct character.
- Send Keystrokes... - the final option allows the technician to select any key combination and text to send to the customer's machine.
Advanced Tools Menu
The tools menu allows the technician to invoke a range of actions and commands during a session. The tools menu is shown below:
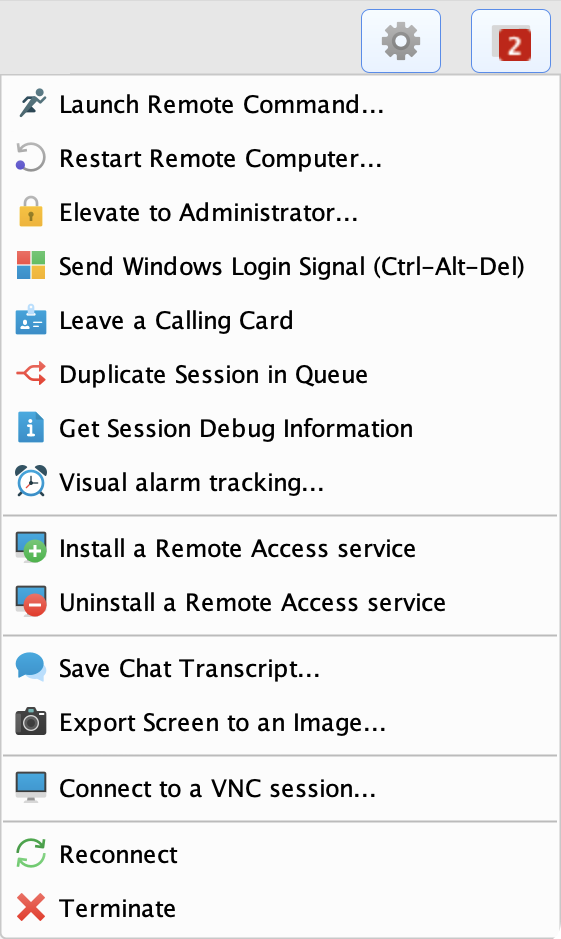
In a support session, the technician can choose to enter the customer into the waiting queue again. This duplicates the support session, allowing any other technician to connect to the same customer at the same time. The options in the menu differ depending on whether the session is a remote support or remote access session.
Launch Remote Command - Run a command on the remote computer, such as cmd.exe on Windows to show a command prompt.
Restart Remote Computer - Restart the remote computer. On Windows an additional option is presented to the technician to reboot into Safe Mode. Once in Safe Mode the technician should reboot into Normal Mode to avoid continually rebooting into Safe Mode.
Elevate to Administrator - Elevate to Administrator allows the technician to provide (or ask the customer for) administrator access, thereby allowing the session to perform privileged actions such as installing or removing Remote Access Service installations.
Send Windows Login Signal (Ctrl+Alt+Del) - Invoke the Ctrl+Alt+Del keyboard sequence on a remote Windows machine.
Leave a Calling Card - In a support session, the technician can leave a calling card on the customer's desktop or in their Programs menu. When run, the calling card will automatically log the customer into the SimpleHelp server's waiting queue, bypassing the need to re-enter their details.
Duplicate Session in Queue - In a support session, the technician can choose to enter the customer into the waiting queue again. This duplicates the support session, allowing any other technician to connect to the same customer at the same time.
Create a Machine Shortcut - In a remote access session, the technician can save a shortcut to the machine they are currently connected to. When run, the shortcut will automatically connect the technician to the remote machine without needing to log into the Technician Console.
Get Session Debug Information - Retrieve a session debug log that can be sent to SimpleHelp to help diagnose session issues.
Visual alarm tracking - Create a visual alarm to be notified when a portion of the remote display changes.
Install a Remote Access Service - SimpleHelp allows the technician to easily install a Remote Access Service during a support session. This ensures that the remote customer's machine will be accessible after a reboot or again in the future.
Uninstall a Remote Access Service - Remove a currently installed Remote Access Service.
Save Chat Transcript - Save a copy of the chat session to file.
Export Screen to Image - Save the current remote screen image to file.
Reconnect - Forcibly reconnect the current remote access session.
Terminate - Terminate the current session.
File Transfer Mode
The file transfer mode can be used to copy files to or from the remote machine. When invoked, the remote desktop view is replaced with the file transfer view:

The technician's file system is presented on the left with the remote machine's file system on the right. The list of finished, or currently running file transfer jobs are presented below. Technicians can press the Put or Get buttons to send files to the remote computer or retrieve files from the remote computer respectively. Each of these actions creates a new job that appears in the jobs list, and is updated as the job proceeds towards completion.
Files can also be Mirrored between the remote and local computers. These options transfer the selected files as with Put or Get, but also ensure that if the files change in the future they are transferred again so that the remote and local files are always synchronised.

By default, hidden files are not visible. You can toggle this behaviour by selecting the grey drop-down arrow and choosing Show hidden files from the resulting menu.
SimpleHelp also makes it easier if you wish to type in the path to a particular folder. This can be useful when switching folders or referencing network drives. To show the text field into which you can enter the path click to the right of the current path sequence. The split path view will change to a text field as follows:

Diagnostics Mode
The diagnostics mode is used to gather information and statistics from the remote computer, or to configure advanced features like port forwarding or registry editing. By default, no metrics are collected from the remote machine. If the technician wishes to collect metrics they can toggle the gather metrics button:

Each of the diagnostics tabs will be populated with metrics in a short while once gathering begins.
Stats Tab
The stats tab contains diagnostic information that lets the technician easily see the CPU usage, memory usage and available disk space on the remote computer. It also includes details about the remote machine's hardware.

Apps Tab
The apps tab lists all the running processes on the remote computer, and includes information about each process including the CPU usage and memory usage. The list of processes appears as follows:

Technicians can perform one of the following actions to terminate running processes:
| X | X |
|---|---|
 |
Stop - stop the selected processes. This option terminates the processes and returns immediately. |
 |
Stop All By Name - stop every process that has the same name as the selected process. This option terminates all the processes with the same name and returns. |
 |
Stop and Repeat - continually stop any processes that appear with the given name. This option continually terminates processes, and is particularly useful when removing regenerative malicious software. |
Info Tab
When diagnostics are gathered for the first time a set of commands are run on the remote machine and their output is returned to the Info tab:

The following information is returned for Windows, Linux and macOS:
| X | X |
|---|---|
| Operating System | Return information detailing the manufacturer and version of the operating system. |
| Network Configuration | Show the current network status, including devices, IP addresses and gateway information. |
| Disk Information | Detail the currently installed disks, including the manufacturer, and space statistics. |
| Memory Information | Print out memory usage information, include total available memory, free memory and swap space. |
| Windows Domain | Print out Windows domain information, include the computer name, logon server and windows domain. |
| Windows Services | Print out advanced Windows service information. |
| Windows Scheduled Tasks | List any tasks currently scheduled on the Windows machine. |
| Windows Driver Query | Displays a list of all installed device drivers and their properties. |
| Linux Swap Space Usage | Print out Linux swap space statistics. |
| Linux CPU Information | Print out the CPU hardware information, including clock speed and CPU count. |
| Linux Active Users | Print out the active users logged into the Linux machine. |
| macOS Active Users | Print out the active users logged into the macOS machine. |
| macOS Hardware Information | Print out macOS hardware information. |
Customer Tab
The customer tab is shown during remote support sessions and contains both the details that the customer entered when logging into the queue, and the automatically collected information.

Console Tab
The console tab allows the technician to execute commands on the remote machine and to see the output each command generates. The output of each command is kept so that they can be easily compared.

Ports Tab
The ports tab allows the technician to forward ports of the support session. Port forwarding allows the technician to nominate a local port and a remote port. SimpleHelp then accepts all data sent on the local port and forwards it to the remote port on the remote machine. Port forwarding allows the technician to do very powerful things, such as establish a session to a remote computer and subsequently use RDP to connect to a second computer on the remote network, over the SimpleHelp session. The port forwarding tab is split into two parts:

The top section contains a list of existing port forward settings. Each setting indicates the local port, and the target remote port. The green arrow on each line indicates in which direction data is forwarded.
To add a new port forward entry the technician must enter the following information:
- Local Port - the local port number that SimpleHelp should listen on. Any third party software that sends data to this local port will actually be sending it to the remote port on the remote machine.
- Direction - click the green arrow button to specify whether SimpleHelp should listen on the local port and forward to the remote port, or should listen on the remote port and forward back to the local port.
- Remote Port - specify the remote port, or alternatively the remote machine and port, to send data to. By specifying a remote machine and a port, access to machines on the remote network can be achieved through the SimpleHelp session.
Registry Tab
The registry tab is split vertically into two sections:

On the left is a hierarchy of registry keys, and on the right a table of registry values. The values are updated whenever a new key is selected. Using the registry editor a technician can easily:
| X | X |
|---|---|
 |
Create a new key as a child of the currently selected key. SimpleHelp will immediately create the new key on the remote machine and update the registry hierarchy. |
 |
Remove the currently selected key and all associated values. |
 |
Create a new value for the currently selected key. The technician must specify the value name, type and content. See below for a list of supported registry types. |
 |
Remove the currently selected value. |
SimpleHelp supports a range of registry value types. Currently no binary types are supported. The supported types are:
| X | X |
|---|---|
| REG_DWORD | A 32bit numerical integer value. |
| REG_QWORD | A 64bit numerical integer value. |
| REG_SZ | A single sentence of text. |
| REG_MULTI_SZ | A set of text sentences, each separated by a new line. |
| REG_EXPAND_SZ | A single sentence of text that contains references to environment variables, such as %PATH%. |
Services Tab
SimpleHelp allows the technician to easily control Windows Services from within the Diagnostics tab. The services view is shown below:

Every configured Windows service is listed, including those that are not currently running. Each service entry includes the service name, whether it is currently started, whether it starts automatically or manually, a description of the service and the command line that is run when the server is started.
To control the state of a service begin by selecting the service and then invoking one of the following actions:
| X | X |
|---|---|
 |
Stop a service that is currently started. |
 |
Start a service that is currently stopped. |
 |
Remove the selected service. |
 |
Configure the selected service startup mode. Choose between Automatic (service starts automatically on system startup), Manual (service must be started manually by the user) or Disabled (the service cannot be started). |
 |
Refresh the list of services. |
VNC Mode
One advanced feature of SimpleHelp is the ability to start VNC sessions directly from within an existing SimpleHelp session. VNC connections are made between the remote machine and any VNC server on the remote network. This allows the technician to use a SimpleHelp session as a gateway in order to connect to VNC servers that are otherwise not accessible to the technician.
SimpleHelp VNC mode can also be used to establish Apple Remote Desktop connections to macOS machines that have the Remote Management or Screen Sharing service enabled.
To connect to a VNC server or macOS machine enter an IP address and port to connect on. The default VNC port is 5900. Note that the port configured on your server may vary.
SimpleHelp supports two VNC authentication types:
| X | X |
|---|---|
| VNC Password | A default plain text VNC server password |
| Apple Authentication | On macOS servers that require authentication the technician will be prompted for user credentials. Once entered the technician is automatically logged in. |
Once a VNC connection is made the remote desktop view will change to show the VNC server instead. At any point the technician can terminate the VNC connection by pressing the red Terminate button in the button bar.
VNC connections are far more limited than SimpleHelp sessions. As such, advanced features such as fast screen capture, file transfer, diagnostics and chat are not included in a VNC session.
Session Settings
In this section we detail each of the session tools. Session tools are accessible by flipping the chat panel. The result is shown below:
SimpleHelp includes the following session settings:
Remote Printing - If enabled, the remote machine will install a printer that allows the technician to print on a local printer from the remote machine.
Switch Desktop Background - If enabled, the remote machine's desktop wallpaper is cleared and a uniform colour is set instead. This improves session performance.
Use Slower Comprehensive Capture - SimpleHelp supports a slower comprehensive capture method. If some windows are not being captured correctly then the technician can enable this option. On Windows this allows SimpleHelp to capture special layered windows.
Disable Advanced Graphics - On legacy systems screen capture is sometimes faster if hardware acceleration and advanced graphics are disabled.
Disable Windows Aero - Switch from the complex Windows Aero theme to the basic theme to improve performance.
Blank Remote Display - On supported operating systems technicians can blank the remote desktop while they are working. This feature requires Aero to be disabled.
Lock the desktop when the session ends - When a session ends automatically lock the remote machine.
Log out when the session ends - When a session ends automatically log out the remote user.
Disable User Control - Enable this to prohibit the remote user from being able to interfere with the session by typing or moving their mouse.
Send All Hotkeys - Certain hotkeys, such as the ALT button are interpreted locally. Check this option to send all key presses to the remote machine without capturing them locally.
Disable Num Lock - SimpleHelp disables numlock on the remote machine to better replicate technician keystrokes. If the technician wishes to leave the numlock setting they can disable this option.
Record Session Video - If enabled SimpleHelp will record the current activity of the session user interface. You can optionally restart recording as well. Recordings can be viewed in their associated session's entry in the History tab.
Transmit Audio - If enabled SimpleHelp will transmit system sounds captured on the remote machine back to the technician.
Elevation and Windows UAC
In this section we discuss how SimpleHelp handles elevate and Windows UAC. When a customer initiates a new remote support session they are given the option to elevate the session. If they choose to do this then the resulting session is elevated. If they choose to skip this step then the session in non-elevated.
Non-elevated applications cannot interact with elevated applications. If the technician wishes to interact with an elevated application then they must ensure that the session is elevated first.
Technicians are notified of non-elevated sessions via a drop-down message in the remote desktop view. At any point a technician can choose to elevate the session via Elevate to Administrator option in the Tools menu. Here they can enter in administrator credentials themselves, or can prompt the customer to enter in the credentials. Once successful, the session is elevated and the technician can interact with elevated applications.
Windows UAC
In this section we detail how SimpleHelp handles Windows UAC prompts. The way that SimpleHelp manages UAC prompts is dependent on whether or not the session is elevated. Consider the following three cases:
| X | X |
|---|---|
| Elevated Support Session | The session is elevated. UAC prompts are shown on the user's desktop and the technician can view and click them. |
| Non-Elevated Support Session | UAC prompts are shown on the secure desktop by default. Windows prohibits SimpleHelp from interacting with this desktop, so UAC prompts will need to be cleared by the customer. The technician can elevate the session after which the technician can view and control UAC prompts. |
| Remote Access Session | Access sessions are always elevated and privileged. UAC prompts are shown on the user's desktop and the technician can view and click them. |
In summary, the technician can view and interact with UAC prompts in elevated support sessions and in remote access sessions. In non-elevated sessions the technician must first elevate prior to being able to interact with UAC prompts. During elevation, the technician can provide the administrator credentials or can alternatively prompt the customer to enter them.
If UAC is not enabled, or if the Windows version does not include UAC, then there are no restrictions on how the technician interacts with the remote desktop.